标签:
如果是基于Eclipse使用Junit,在现在的Eclipse版本中都已经集成了Junit,可以根据自身的需求自由使用Junit3或者Junit4。在本文中主要通过测试简单算术程序(加,减,乘,除)来介绍Junit4的使用,并引入一个简单的案例进行讲解。
Step 1: 写出基本的算术代码Calculate.java
package com.ysc.main;

public class Calculate {
    public static int add(int a, int b) {
        return a + b;
    }

    public static int minus(int a, int b) {
        return a - b;
    }

    public static int divide(int a, int b) throws Exception {
        if (b == 0) {
            throw new Exception("除数不能为0");
        }
        return a / b;
    }

    public static int multiply(int a, int b) {
        return a * b;
    }
}
Step 2: 对Calculate类添加Junit4的测试单元,右键->new->JUnit Test Case,如下图
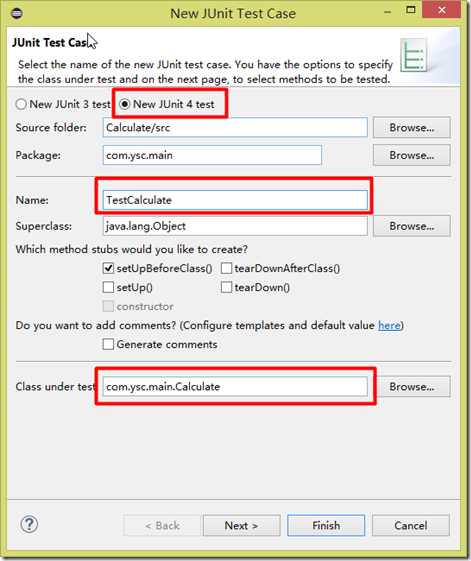
Step 3: 对添加的测试用例进行配置,命名为TestCalculate,点击Next
Step 4: 选择需要测试的函数,点击Finish,完成JUnit的基本配置
Step 5: 在经过上面的步骤之后,就可以得到配置好的测试用例
package com.ysc.main;

import static org.junit.Assert.*;

import org.junit.Before;
import org.junit.BeforeClass;
import org.junit.Test;

public class CalculateTest {

    @BeforeClass
    public static void setUpBeforeClass() throws Exception {
    }

    @Before
    public void setUp() throws Exception {
    }

    @Test
    public void testAdd() {
        fail("Not yet implemented");
    }

    @Test
    public void testMinus() {
        fail("Not yet implemented");
    }

    @Test
    public void testDivide() {
        fail("Not yet implemented");
    }

    @Test
    public void testMultiply() {
        fail("Not yet implemented");
    }

}
Step 6: 现在需要做的就是添加上需要测试的数据
package com.ysc.main;

import static org.junit.Assert.*;

import org.junit.Before;
import org.junit.BeforeClass;
import org.junit.Test;

public class CalculateTest {

    @BeforeClass
    public static void setUpBeforeClass() throws Exception {
    }

    @Before
    public void setUp() throws Exception {
    }

    @Test
    public void testAdd() {
        assertEquals(5, Calculate.add(1, 4));
    }

    @Test
    public void testMinus() {
        assertEquals(-1, Calculate.minus(2, 3));
    }

    @Test
    public void testDivide() throws Exception {
        assertEquals(0, Calculate.divide(1, 4));
    }

    @Test
    public void testMultiply() {
        assertEquals(4, Calculate.multiply(1, 4));
    }

}
Step 7: 开始进行测试,右键->Run as->JUnit Test
由于添加的数据都是正常运行的数据,所有用例都测试正常
Step 6: 单纯一组测试参数肯定不足以确认代码已经达到了预期标准,应该对所有输入进行等价类划分,进行参数化测试。在此例中只对add函数进行参数化测试。
| 左值 | 右值 | 预期结果 | |
| case 1 | 1 | 1 | 2 |
| case 2 | -1 | -1 | -2 |
| case 3 | 1 | -1 | 0 |
| case 4 | 1 | -2147483648 | |
| case 5 | -2147483648 | -1 | 2147483647 |
修改TestCalculate,注意在类上方需要加注解 @RunWith(Parameterized.class)
package com.ysc.main;

import static org.junit.Assert.assertEquals;

import java.util.Arrays;
import java.util.Collection;

import org.junit.Before;
import org.junit.BeforeClass;
import org.junit.Test;
import org.junit.runner.RunWith;
import org.junit.runners.Parameterized;
import org.junit.runners.Parameterized.Parameters;

@RunWith(Parameterized.class)
public class CalculateTest {

    @Parameters
    public static Collection data() {
        return Arrays.asList(new Object[][] {
                { 1, 1, 2 },
                { -1, -1, -2 },
                { -1, 1, 0 },
                { 2147483647, 1, -2147483647 },
                { -2147483648, -1, 2147483647 }
        });
    }

    private int leftVal;
    private int rightVal;
    private int expectedVal;

    public CalculateTest(int leftVal, int rightVal, int expectedVal) {
        super();
        this.leftVal = leftVal;
        this.rightVal = rightVal;
        this.expectedVal = expectedVal;
    }
}
所有测试用例通过测试,如下图
标签:
原文地址:http://www.cnblogs.com/ishu/p/4527360.html