标签:
1、低功耗模式
在系统或电源复位以后,微控制器处于运行状态。当CPU不需继续运行时,可以利用多种低功耗模式来节省功耗,例如等待某个外部事件时。用户需要根据最低电源消耗、最快速启动时间和可用的唤醒源等条件,选定一个最佳的低功耗模式。
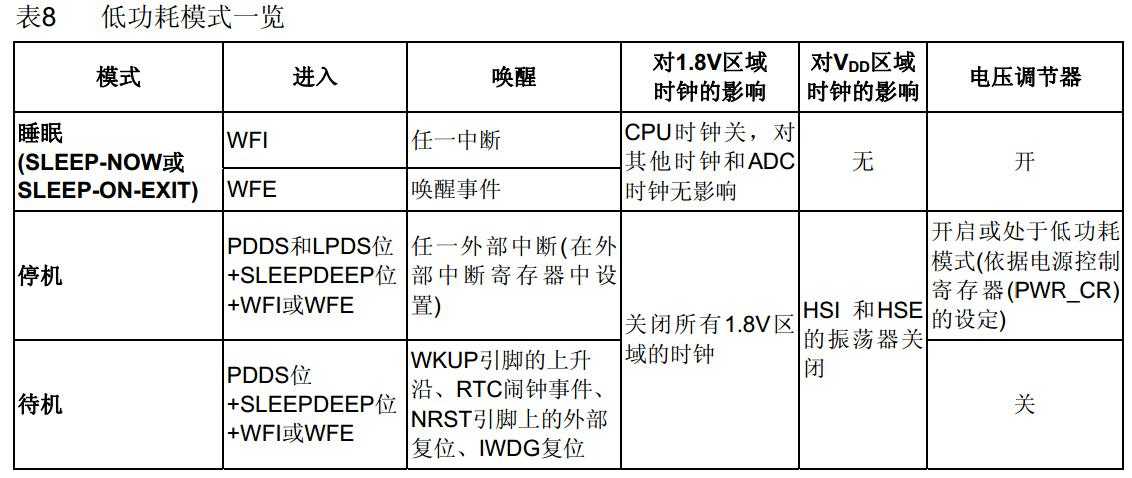
2、STM32F10xxx有三种低功耗模式:
● 睡眠模式(Cortex™-M3内核停止,所有外设包括Cortex-M3核心的外设,如NVIC、系统时钟(SysTick)等仍在运行)
● 停止模式(所有的时钟都已停止)
● 待机模式(1.8V电源关闭)
此外,在运行模式下,可以通过以下方式中的一种降低功耗:
● 降低系统时钟
● 关闭APB和AHB总线上未被使用的外设时钟。
3、外部时钟的控制
在运行模式下,任何时候都可以通过停止为外设和内存提供时钟(HCLK和PCLKx)来减少功耗。为了在睡眠模式下更多地减少功耗,可在执行WFI或WFE指令前关闭所有外设的时钟。
通过设置AHB外设时钟使能寄存器(RCC_AHBENR)、APB2外设时钟使能寄存器(RCC_APB2ENR)和APB1外设时钟使能寄存器(RCC_APB1ENR)来开关各个外设模块的时钟。
4、待机模式
待机模式可实现系统的最低功耗。该模式是在Cortex-M3深睡眠模式时关闭电压调节器。整个1.8V供电区域被断电。PLL、HSI和HSE振荡器也被断电。SRAM和寄存器内容丢失。只有备份的寄存器和待机电路维持供电
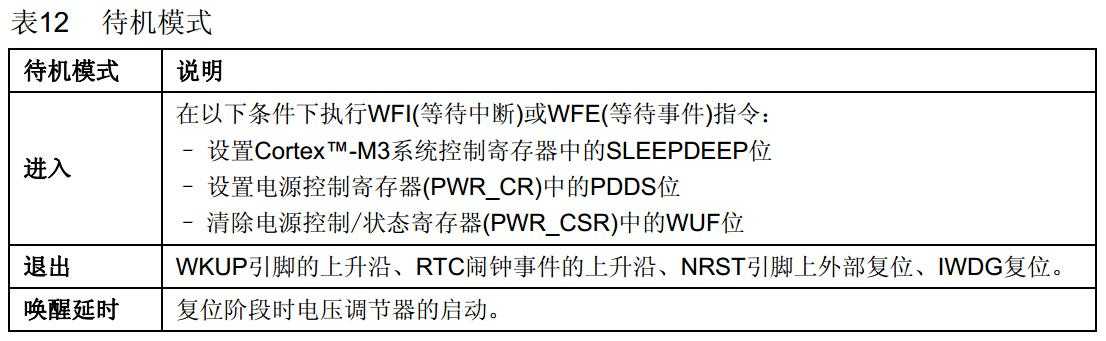
5、退出待机模式
当一个外部复位(NRST引脚)、IWDG复位、WKUP引脚上的上升沿或RTC闹钟事件的上升沿发生时,微控制器从待机模式退出。从待机唤醒后,除了 电源控制/状态寄存器(PWR_CSR),所有寄存器被复位。从待机模式唤醒后的代码执行等同于复位后的执行(采样启动模式引脚、读取复位向量等)。电源控制/状态寄存器(PWR_CSR)将会指示内核由待机状态退出。
待机模式下的输入/输出端口状态在待机模式下,所有的I/O引脚处于高阻态,除了以下的引脚: ● 复位引脚(始终有效) ● 当被设置为防侵入或校准输出时的TAMPER引脚 ● 被使能的唤醒引脚
6、代码例程:

  1 /*************************************************************************************************************************************
  2 *
  3 *  文件名称:main.c
  4 *  文件功能:主函数文件
  5 *
  6 ***************************************************************************************************************************************/
  7
  8 #include "pbdata.h"//调用自定义公共函数库
  9
 10
 11 /*********************************************************************************
 12 *
 13 * 初始化操作
 14 *
 15 *********************************************************************************/
 16 void RCC_Configuration(void);//系统时钟初始化函数声明
 17 void GPIO_Configuration(void);//GPIO初始化函数声明
 18 void NVIC_Configuration(void);//中断优先级配置函数声明
 19 void USART_Configuration(void);//串口配置函数声明
 20 void  Sys_Standby(void);//进入待机模式+9
 21
 22
 23
 24
 25 /********************************************************************************
 26 *
 27 *  函数名称:main(void)
 28 *  函数功能:主函数
 29 *  函数说明:不能用void定义主函数
 30 *
 31 ********************************************************************************/
 32 int main(void)//void不能void定义主函数
 33 {
 34
 35     RCC_Configuration();    //系统时钟初始化
 36
 37     GPIO_Configuration();//端口初始化
 38
 39     USART_Configuration();//串口配置
 40
 41     NVIC_Configuration();//中断优先级配置
 42
 43
 44
 45     while(1)
 46     {
 47         printf("liubo\n");
 48
 49         delay_ms(3000);
 50
 51         printf("last:5s\n");//先倒计时
 52     delay_ms(1000);
 53     printf("last:4s\n");
 54     delay_ms(1000);
 55     printf("last:3s\n");
 56     delay_ms(1000);
 57     printf("last:2s\n");
 58     delay_ms(1000);
 59     printf("last:1s\n");
 60     delay_ms(1000);
 61     printf("enter Standby state:\n");//进入待机状态
 62     Sys_Standby();
 63
 64     }
 65
 66 }
 67
 68
 69
 70
 71 /********************************************************************************
 72 *
 73 *  函数名称:RCC_Configuration(void)
 74 *  函数功能:系统时钟高初始化函数
 75 *
 76 ********************************************************************************/
 77     void RCC_Configuration(void)//系统时钟高初始化函数
 78   {
 79
 80     SystemInit();//系统初始化
 81     RCC_APB2PeriphClockCmd(RCC_APB2Periph_GPIOA,ENABLE);//串口对应GPIO时钟使能
 82         RCC_APB2PeriphClockCmd(RCC_APB2Periph_USART1,ENABLE);//串口时钟使能
 83         RCC_APB2PeriphClockCmd(RCC_APB2Periph_AFIO,ENABLE);//引脚复用
 84
 85     }
 86
 87
 88
 89 /*******************************************************************************
 90 *
 91 * 函数名称:GPIO_Configuration(void)
 92 * 函数功能:GPIO初始化函数
 93 *
 94 ********************************************************************************/
 95
 96     void GPIO_Configuration(void)//GPIO初始化函数
 97   {
 98
 99
100 /*串口引脚配置*/
101         GPIO_InitTypeDef GPIO_InitStructure;//定义一个GPIO设置的结构体变量
102
103 /*输出引脚配置*/
104         /*结构体变量赋值*/
105       GPIO_InitStructure.GPIO_Pin=GPIO_Pin_9;////引脚配置TX
106       GPIO_InitStructure.GPIO_Speed=GPIO_Speed_50MHz;//配置频率
107         GPIO_InitStructure.GPIO_Mode=GPIO_Mode_AF_PP;//发送要配置成复用推挽输出
108         /*对应的GPIO初始化*/
109       GPIO_Init(GPIOA,&GPIO_InitStructure);
110
111
112 /*输入引脚配置*/
113         /*结构体变量赋值*/
114       GPIO_InitStructure.GPIO_Pin=GPIO_Pin_10;////引脚配置RX
115         GPIO_InitStructure.GPIO_Mode=GPIO_Mode_IN_FLOATING;//接收引脚配置成浮空输入
116         /*对应的GPIO初始化*/
117       GPIO_Init(GPIOA,&GPIO_InitStructure);
118
119
120   }
121
122
123 /****************************************************************************
124 *
125 *  函数名称:NVIC_Configuration(void)
126 *  函数功能:配置中断优先级
127 *
128 ****************************************************************************/
129
130 void NVIC_Configuration(void)
131 {
132   NVIC_InitTypeDef NVIC_InitStructure; //定义一个优先级配置结构体变量
133
134   NVIC_PriorityGroupConfig(NVIC_PriorityGroup_1);//分组
135
136   NVIC_InitStructure.NVIC_IRQChannel = USART1_IRQn;
137   NVIC_InitStructure.NVIC_IRQChannelPreemptionPriority = 0;//抢断优先级
138   NVIC_InitStructure.NVIC_IRQChannelSubPriority = 1;//响应优先级
139   NVIC_InitStructure.NVIC_IRQChannelCmd = ENABLE;//使能
140
141   NVIC_Init(&NVIC_InitStructure);//初始化
142 }
143
144
145 /*********************************************************************************
146 *
147 *  函数名称:
148 *  函数功能:串口配置函数
149 *
150 *********************************************************************************/
151 void USART_Configuration(void)
152 {
153 /*定义串口配置结构体变量*/
154         USART_InitTypeDef USART_InitStructure;//定义一个串口配置结构体变量
155
156
157 /*结构体变量赋值*/
158     USART_InitStructure.USART_BaudRate = 9600;//波特率9600
159     USART_InitStructure.USART_WordLength = USART_WordLength_8b;//位宽,8位
160     USART_InitStructure.USART_StopBits = USART_StopBits_1;//停止位1
161     USART_InitStructure.USART_Parity = USART_Parity_No;//不奇偶校验
162     USART_InitStructure.USART_HardwareFlowControl = USART_HardwareFlowControl_None;//流控禁止
163     USART_InitStructure.USART_Mode = USART_Mode_Tx | USART_Mode_Rx;//发送使能
164
165
166 /*发送串口配置初始化*/
167     USART_Init(USART1, &USART_InitStructure);
168
169
170 /*打开串口接收中断*/
171       USART_ITConfig(USART1,USART_IT_RXNE,ENABLE);//当接收到数据时,会产生中断
172
173
174 /*打开串口*/
175     USART_Cmd(USART1,ENABLE);//串口使能,打开
176
177 /*清空中断标志位*/
178     USART_ClearFlag(USART1,USART_FLAG_TC);
179 }
180
181
182
183
184
185 /********************************************************************************
186 *
187 *  函数名称:Sys_Standby(void)
188 *  函数功能:进入待机模式函数
189 *
190 ********************************************************************************/
191
192 //待机模式
193 void  Sys_Standby(void)
194 {
195   NVIC_SystemLPConfig(NVIC_LP_SLEEPDEEP,ENABLE);//选择待机模式
196
197   RCC_APB1PeriphClockCmd(RCC_APB1Periph_PWR,ENABLE);//使能PWR外设时钟
198
199   PWR_WakeUpPinCmd(ENABLE);//使能唤醒管脚
200
201   PWR_EnterSTANDBYMode();//进入待机模式
202
203 }
204
205
206
207
208
209
210
211
212
213
214
215
216
217
218
219
220
221
222
223
224
225
226
227
228
229
230
231
232
 1 /*pbdata.h*/
 2 /***************************************************************************************************
 3 *
 4 * 文件名称:pbdata.h
 5 * 文件功能:自定义的函数和全局变量的声明头文件
 6 *
 7 ***************************************************************************************************/
 8
 9 #ifndef _pbdata_H
10 #define _pbdata_H
11
12
13
14
15
16 /********************************************************************
17 *
18 *  调用的头文件放在这里
19 *
20 ********************************************************************/
21 #include "stm32f10x.h"
22
23
24 #include "stm32f10x_rcc.h"
25 #include "stm32f10x_gpio.h"
26 #include "misc.h"
27 #include "stm32f10x_adc.h"
28 #include "stm32f10x_bkp.h"
29 #include "stm32f10x_can.h"
30 #include "stm32f10x_cec.h"
31 #include "stm32f10x_dac.h"
32 #include "stm32f10x_dbgmcu.h"
33 #include "stm32f10x_dma.h"
34 #include "stm32f10x_exti.h"
35 #include "stm32f10x_flash.h"
36 #include "stm32f10x_fsmc.h"
37 #include "stm32f10x_i2c.h"
38 #include "stm32f10x_iwdg.h"
39 #include "stm32f10x_pwr.h"
40 #include "stm32f10x_rtc.h"
41 #include "stm32f10x_sdio.h"
42 #include "stm32f10x_spi.h"
43 #include "stm32f10x_tim.h"
44 #include "stm32f10x_usart.h"
45 #include "stm32f10x_wwdg.h"
46
47
48 #include "stdio.h"
49
50
51
52
53 /********************************************************************
54 *
55 *  自定义全局变量声明
56 *
57 ********************************************************************/
58 extern u8 dt;
59
60
61
62
63
64 /********************************************************************
65 *
66 *  自定义全函数声明
67 *
68 ********************************************************************/
69 void delay(u32 nCount);
70 void delay_us(u32 nus);
71 void delay_ms(u16 nms);
72 int fputc(int ch,FILE *F);
73
74
75
76 #endif
  1 /****************************************************************************************************************
  2 *
  3 * 文件名称:pbdata.c
  4 * 文件功能:自定义函数或者全局变量的初始化
  5 *
  6 ****************************************************************************************************************/
  7
  8 /*头文件声明*/
  9 #include "pbdata.h"
 10
 11
 12
 13
 14 /********************************************************************************************
 15 *
 16 * 自定义全局变量
 17 *
 18 ********************************************************************************************/
 19 u8 dt=0;
 20
 21
 22
 23
 24
 25 /******************************************************************************************
 26 *
 27 * 自定义函数
 28 *
 29 ******************************************************************************************/
 30
 31
 32
 33 /**************************************************
 34 *
 35 *  函数名称:delay_us(u32 nus)
 36 *  函数功能:微秒延时函数
 37 *  输入参数:输入值为延时us
 38 *
 39 ***************************************************/
 40 void delay_us(u32 nus)
 41 {
 42     u32 temp;
 43     SysTick->LOAD = 9*nus;//载入初值,72M/8=9M,也就是1/9us,9*1/9us,所以是执行9次
 44     SysTick->VAL=0X00;//清空计数器,清空后,就自动设置自己设定的计数器的值
 45     SysTick->CTRL=0X01;//使能,减到零动作(不发生中断),采用外部时钟
 46
 47     do
 48     {
 49           temp=SysTick->CTRL;//标志位,等到一直减到0
 50          }while((temp&0x01)&&(!(temp&(1<<16))));//等待时间到达
 51
 52     SysTick->CTRL=0x00; //关闭计数器
 53     SysTick->VAL =0X00; //清空计数器
 54 }
 55
 56
 57
 58
 59
 60
 61
 62 /***************************************************
 63 *
 64 * 函数名称:delay_ms(u16 nms)
 65 * 函数功能:毫秒级延时
 66 * 输入参数:输入值位延时ms
 67 *
 68 ****************************************************/
 69 void delay_ms(u16 nms)
 70 {
 71     u32 temp;
 72     SysTick->LOAD = 9000*nms;//载入初值,72M/8=9M,也就是1/9us,9*1/9us,所以是执行9000次
 73     SysTick->VAL=0X00;//清空计数器,清空后,就自动设置自己设定的计数器的值
 74     SysTick->CTRL=0X01;//使能,减到零动作(不发生中断),采用外部时钟
 75
 76     do
 77     {
 78           temp=SysTick->CTRL;//标志位,等到一直减到0
 79          }while((temp&0x01)&&(!(temp&(1<<16))));//等待时间到达
 80
 81     SysTick->CTRL=0x00; //关闭计数器
 82     SysTick->VAL =0X00; //清空计数器
 83 }
 84
 85
 86
 87 /****************************************************
 88 *
 89 * 重定义printf函数部分
 90 *
 91 ****************************************************/
 92 int fputc(int ch,FILE *F)
 93 {
 94
 95     USART_SendData(USART1,(u8)ch);
 96
 97     while(USART_GetFlagStatus(USART1,USART_FLAG_TXE)==RESET);//等待发送完成,判断标志位
 98
 99     return ch;
100 }
7、工程下载:
http://download.csdn.net/detail/a1181803348/8761503
标签:
原文地址:http://www.cnblogs.com/STM32bo/p/4544708.html
