标签:des style blog code http com
这一节我们来分析Mirror
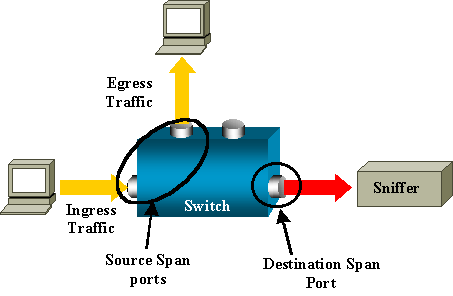
Mirror就是配置一个bridge,将某些包发给指定的mirrored ports
对于包的选择:
对于指定的目的:
Port mirroring on a Cisco Systems switch is generally referred to as Switched Port ANalyzer (SPAN) or Remote Switched Port ANalyzer (RSPAN)
(1) Configure Mirroring
root@XorPlus# ovs-vsctl --db=tcp:10.10.50.215:6633 -- set bridge br0 mirrors=@m -- --id=@te-1/1/1 get Port te-1/1/1 -- --id=@te-1/1/2 get Port te-1/1/2 -- --id=@te-1/1/3 get Port te-1/1/3 -- --id=@m create Mirror name=mymirror select-dst-port=@te-1/1/1,@te-1/1/2 select-src-port=@te-1/1/1,@te-1/1/2 output-port=@te-1/1/3 root@XorPlus#
In above configuration, user configure the te-1/1/1, te-1/1/2 and te-1/1/3 in the mirroring, in which the source port are te-1/1/1 and te-1/1/2 (including the ingress and egress), the output port (monitor port) is te-1/1/3.
The “select-dst-port” means some packet (in switch chip) will go-out from the specified port (egress).
The “select-src-port” means some packet enter the specified port (ingress).
(2) Delete the Mirroring
root@XorPlus# ovs-vsctl --db=tcp:10.10.50.215:6633 -- remove bridge br0 mirrors mymirror


RSPAN allows you to monitor source ports that are spread all over a switched network, not only locally on a switch with SPAN.
The functionality works exactly as a regular SPAN session. The traffic that is monitored by SPAN is not directly copied to the destination port, but flooded into a special RSPAN VLAN. The destination port can then be located anywhere in this RSPAN VLAN. There can even be several destination ports.
These are a few remarks on this design:
我们先来测试SPAN
我们按照下面的拓扑结构创建vswitch
$ sudo ovs-vsctl add-port helloworld first_br
$ sudo ovs-vsctl add-port helloworld second_br -- set Port second_br tag=110
$ sudo ovs-vsctl add-br helloworld1
$ sudo ovs-vsctl add-port helloworld1 second_if -- set Port second_if tag=110
$ sudo ovs-vsctl add-port helloworld1 third_br -- set Port third_br tag=110
$ sudo ovs-vsctl show
c24322e6-8453-402a-afaf-64757ef231e9
Bridge helloworld
Controller "tcp:16.158.165.102:6633"
is_connected: true
Port "vnet8"
Interface "vnet8"
Port first_br
Interface first_br
Port second_br
tag: 110
Interface second_br
Port "vnet10"
Interface "vnet10"
Port helloworld
Interface helloworld
type: internal
Port "vnet9"
Interface "vnet9"
Bridge "helloworld1"
Port second_if
tag: 110
Interface second_if
Port "helloworld1"
Interface "helloworld1"
type: internal
Port third_br
tag: 110
Interface third_br
ovs_version: "2.0.1"
然后我们在first_br上面mirror所有进出vnet8的包
$ sudo ovs-vsctl -- set bridge helloworld mirrors=@m -- --id=@vnet8 get Port vnet8 -- --id=@first_br get Port first_br -- --id=@m create Mirror name=mirrorvnet8 select-dst-port=@vnet8 select-src-port=@vnet8 output-port=@first_br
19ed2f51-3245-4d5b-8e6c-67ccbb7c7ebd
这时候我们监听first_if,并且从instance01里面ping 10.10.10.3,可以看到下面的效果
$ sudo tcpdump -n -i first_if icmp
tcpdump: WARNING: first_if: no IPv4 address assigned
tcpdump: verbose output suppressed, use -v or -vv for full protocol decode
listening on first_if, link-type EN10MB (Ethernet), capture size 65535 bytes
23:58:02.310198 IP 10.10.10.1 > 10.10.10.3: ICMP echo request, id 3200, seq 1, length 64
23:58:02.312447 IP 10.10.10.1 > 10.10.10.3: ICMP echo request, id 3200, seq 1, length 64
23:58:02.314314 IP 10.10.10.3 > 10.10.10.1: ICMP echo reply, id 3200, seq 1, length 64
23:58:03.311894 IP 10.10.10.1 > 10.10.10.3: ICMP echo request, id 3200, seq 2, length 64
23:58:03.312266 IP 10.10.10.3 > 10.10.10.1: ICMP echo reply, id 3200, seq 2, length 64
23:58:04.313522 IP 10.10.10.1 > 10.10.10.3: ICMP echo request, id 3200, seq 3, length 64
23:58:04.313739 IP 10.10.10.3 > 10.10.10.1: ICMP echo reply, id 3200, seq 3, length 64
23:58:05.314827 IP 10.10.10.1 > 10.10.10.3: ICMP echo request, id 3200, seq 4, length 64
23:58:05.314979 IP 10.10.10.3 > 10.10.10.1: ICMP echo reply, id 3200, seq 4, length 64
23:58:06.316870 IP 10.10.10.1 > 10.10.10.3: ICMP echo request, id 3200, seq 5, length 64
23:58:06.317156 IP 10.10.10.3 > 10.10.10.1: ICMP echo reply, id 3200, seq 5, length 64
23:58:07.318242 IP 10.10.10.1 > 10.10.10.3: ICMP echo request, id 3200, seq 6, length 64
23:58:07.318481 IP 10.10.10.3 > 10.10.10.1: ICMP echo reply, id 3200, seq 6, length 64
23:58:08.319579 IP 10.10.10.1 > 10.10.10.3: ICMP echo request, id 3200, seq 7, length 64
23:58:08.319802 IP 10.10.10.3 > 10.10.10.1: ICMP echo reply, id 3200, seq 7, length 64
然后我们来配置RSPAN
我们对进入vnet9的所有进出包,然而ouput到一个vlan 110
$ sudo ovs-vsctl -- set bridge helloworld mirrors=@m -- --id=@vnet9 get Port vnet9 -- --id=@m create Mirror name=mirrorvnet9 select-dst-port=@vnet9 select-src-port=@vnet9 output-vlan=110
cb361fa2-914d-494b-94ef-c625d194247c
在helloworld1中也要配置从110来的,都output到vlan 110
$ sudo ovs-vsctl -- set bridge helloworld1 mirrors=@m -- --id=@m create Mirror name=mirrorvlan select-vlan=110 output-vlan=110
cef13445-c6ea-45e7-bb9d-1a267b24c91c
disable mac address learning for vlan 110
$ sudo ovs-vsctl set bridge helloworld flood-vlans=110
$ sudo ovs-vsctl set bridge helloworld1 flood-vlans=110
这时候我们监听third_if,并且从instance02里面ping 10.10.10.3,可以看到下面的效果
$ sudo tcpdump -n -i third_if icmp
tcpdump: WARNING: third_if: no IPv4 address assigned
tcpdump: verbose output suppressed, use -v or -vv for full protocol decode
listening on third_if, link-type EN10MB (Ethernet), capture size 65535 bytes
00:24:38.089192 IP 10.10.10.2 > 10.10.10.3: ICMP echo request, id 2999, seq 1, length 64
00:24:38.090844 IP 10.10.10.2 > 10.10.10.3: ICMP echo request, id 2999, seq 1, length 64
00:24:38.093228 IP 10.10.10.3 > 10.10.10.2: ICMP echo reply, id 2999, seq 1, length 64
00:24:39.090506 IP 10.10.10.2 > 10.10.10.3: ICMP echo request, id 2999, seq 2, length 64
00:24:39.091024 IP 10.10.10.3 > 10.10.10.2: ICMP echo reply, id 2999, seq 2, length 64
00:24:40.091945 IP 10.10.10.2 > 10.10.10.3: ICMP echo request, id 2999, seq 3, length 64
00:24:40.092202 IP 10.10.10.3 > 10.10.10.2: ICMP echo reply, id 2999, seq 3, length 64
00:24:41.093826 IP 10.10.10.2 > 10.10.10.3: ICMP echo request, id 2999, seq 4, length 64
00:24:41.093917 IP 10.10.10.3 > 10.10.10.2: ICMP echo reply, id 2999, seq 4, length 64
00:24:42.095681 IP 10.10.10.2 > 10.10.10.3: ICMP echo request, id 2999, seq 5, length 64
00:24:42.095915 IP 10.10.10.3 > 10.10.10.2: ICMP echo reply, id 2999, seq 5, length 64
00:24:43.097414 IP 10.10.10.2 > 10.10.10.3: ICMP echo request, id 2999, seq 6, length 64
00:24:43.097586 IP 10.10.10.3 > 10.10.10.2: ICMP echo reply, id 2999, seq 6, length 64
Openvswitch手册(4),布布扣,bubuko.com
标签:des style blog code http com
原文地址:http://www.cnblogs.com/popsuper1982/p/3800585.html