标签:class blog code http tar ext
比如、以1秒钟为间隔,实时打印tsar的概述数据
[root@localhost tsar-2.1.0]# tsar -i 1 -l
再比如:
tsar 显示1天内的历史汇总(summury)信息,以默认5分钟为间隔
tsar --cpu -i 1 显示一天内cpu的历史信息,以1分钟为间隔
tsar --live --mem -i 2 以2秒钟为间隔,实时打印mem的数据。
tsar --cpu --mem -i 1 显示一天内的cpu和内存历史数据,以1分钟为间隔
更多用法、请咨询 http://code.taobao.org/p/tsar/wiki/index/
tsar是淘宝自己开发的一个采集工具,主要用来收集服务器的系统信息(如cpu,io,mem,tcp等),以及应用数据(如squid haproxy nginx等)。
收集到的数据存储在磁盘上,可以随时查询历史信息,输出方式灵活多样,另外支持将数据存储到mysql中,也可以将数据发送到nagios报警服务器。
tsar在展示数据时,可以指定模块,并且可以对多条信息的数据进行merge输出,带--live参数可以输出秒级的实时信息。
Tsar是基于模块化设计的程序,程序有两部分组成:框架和模块。
框架程序源代码主要在src目录,而模块源代码主要在modules目录中。
框架提供对配置文件的解析,模块的加载,命令行参数的解析,应用模块的接口对模块原始数据的解析与输出。 模块提供接口给框架调用。
tsar依赖与cron每分钟执行采集数据,因此它需要系统安装并启用crond,安装后,tsar每分钟会执行tsar --cron来定时采集信息,并且记录到原始日志文件。
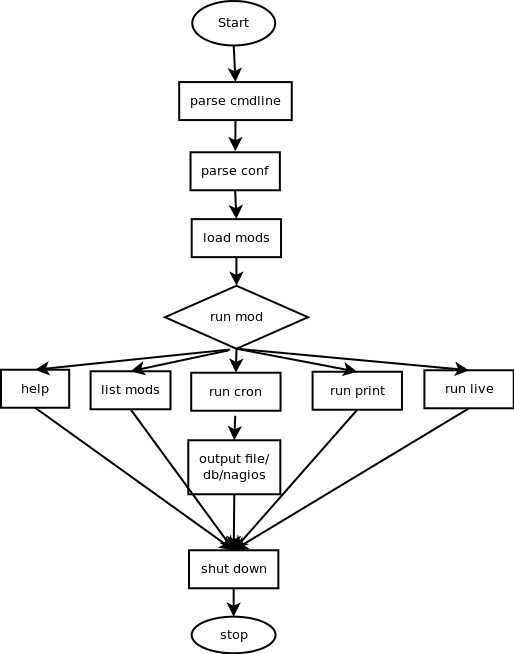
tsar的运行流程图如下:

主要执行流程有:
1.解析输入
根据用户的输入,初始化一些全局信息,如间隔时间,是否merge,是否指定模块,运行模式
2.读取配置文件信息
主要解析tsar的配置文件,如果include生效,则会解析include的配置文件
配置文件用来获得tsar需要加载的模块,输出方式,每一类输出方式包含的模块,和此输出方式的接收信息
如mod_cpu on代表采集cpu的信息
output_interface file,nagios表示向文件和nagios服务器发送采集信息和报警信息
3.加载相应模块
根据配置文件的模块开启关闭情况,将模块的动态库load到系统
4.tsar的三种运行模式
tsar在运行的时候有三种模式:
print模式仅仅输出指定的模块信息,默认显示最近一天的;
live模式是输出当前信息,可以精确到秒级
cron模式,此一般是crontab定时执行,每一分钟采集一次所有配置的模块信息,并将数据写入原始文件,在cron运行的时候 会判断是否配置输出到db或者nagios,如果配置则将相应格式的数据输出到对应接口。
5.释放资源
程序最后,释放动态库,程序结束
下载: https://github.com/alibaba/tsar
从github上检出代码:
$git clone git://github.com/kongjian/tsar.git
$cd tsar
$make
$make install
或者直接从github上下载源码
$wget -O tsar.zip https://github.com/alibaba/tsar/archive/master.zip
$unzip tsar.zip
$cd tsar
$make
$make install
1.配置文件/etc/tsar/tsar.conf
#debug_level(INFO DEBUG WARN ERROR FATAL)
debug_level FATAL
#[module] on/off to enable mod
mod_cpu on
mod_mem on
mod_swap on
mod_tcp on
mod_udp on
mod_traffic on
mod_io on
mod_pcsw on
mod_partition on
mod_tcpx on
mod_load on

#output type:file,nagios,db
output_interface file

#[output_file] original data to store
output_file_path /var/log/tsar.data

#[output_stdio] these mod will be show as using tsar
output_stdio_mod mod_swap,mod_partition,mod_cpu,mod_mem,mod_traffic,mod_load,mod_tcp,mod_udp,mod_tcpx,mod_pcsw,mod_io

#[output_nagios] the alert will be report to nagios server
#output_nagios_mod #mod_swap,mod_partition,mod_cpu,mod_mem,mod_traffic,mod_load,mod_tcp,mod_udp,mod_tcpx,mod_pcsw,mod_io

#[output_db]
#output_db_mod #mod_swap,mod_partition,mod_cpu,mod_mem,mod_traffic,mod_load,mod_tcp,mod_udp,mod_tcpx,mod_pcsw,mod_io
#output_db_addr console2:56677

#support include other mod conf
include /etc/tsar/conf.d/*.conf
debug_level 指定tsar的运行级别,主要用来调试使用
mod_xxx on/off 开启指定模块
out_interface 设置输出类型,支持file,nagios,db
out_stdio_mod 设置用户终端默认显示的模块
output_db_mod 设置哪些模块输出到数据库
output_db_addr 数据库的ip和端口
output_nagios_mod 设置哪些模块输出到nagios
include 支持include配置,主要用来加载用户的自定义模块
2.配置文件/etc/tsar/nagios.conf
#The IP address of the host running the NSCA daemon
server_addr mmdev4.corp.alimama.com
#The port on which the daemon is running - default is 5667
server_port 8086
#The cycle of send alert to nagios
cycle_time 300
#nsca client program
send_nsca_cmd /usr/bin/send_nsca
send_nsca_conf /home/a/conf/amon/send_nsca.conf

#tsar mod alert config file
#threshold [hostname.]servicename.key;w-min;w-max;c-min;cmax;
threshold cpu.util;N;N;N;N;
threshold mem.util;N;N;N;N;
threshold load.load1;N;N;N;N;
threshold load.load5;N;N;N;N;
threshold load.load15;N;N;N;N;
threshold traffic.bytin;N;N;N;N;
threshold traffic.bytout;N;N;N;N;
threshold tcp.retran;N;N;N;N;
这个文件主要是nagios服务器的配置
cycle_time 指定上报的间隔时间,由于tsar每一分钟采集一次,上报时会判断是否符合时间间隔,如设置300的话,则在0,5等整点分钟会上报nagios
threshold 设置某个要报警项的阀值,前面是模块和要监控的具体名称,后面的四个数据代表报警的范围,warn和critical的范围
3./etc/tsar/conf.d/*
这个目录下是用户的自定义模块配置文件
配置基本在用户开发自定义模块时确定,主要包含模块的开启,输出类型和报警范围
标签:class blog code http tar ext
原文地址:http://www.cnblogs.com/wjoyxt/p/3806416.html