标签:
序
万物初始之前,宇宙是无边无际混沌的黑暗,只有元之灵穿行其间。元对这无边的黑暗十分不满,就轻轻一敲键盘,说:“要有光”,于是世间就有了光。元称“光”为“昼”,称“黑暗”为“夜”。亮光隐去,黑暗重临,从此,世间就有了昼与夜的交替。这是元创世的第一天。
这个二次元世界诞生之初伴有一只程序猿,Ta的名字叫元。
第一章 二叉树必须是最好的树!
元就是这样想的,为了表达对这种数据结构的崇拜之情,决定在这个世界造出一颗真实的树,一开始的构想是这样的

“正所谓树极生三干,三干生六枝,六枝生十二叶。” 然而这并不是一颗二叉树。
第二章 黄金分割現れる
树每递归一层需要按一定比例缩放,元苦苦冥想良久,终于找到了一个无限不循环小数,它的小数点后64位是这样的
0.6180339887 4989484820 4586834365 6381177203 0917980576 2862135448 6227...
[从左至右,比例系数依次是0.618, 0.5, 1, 1.6]

当然树干的粗细也得缩放,元是想将这东西种在伊甸园的土地上的,那就再截去下方的子树

第三章 不对称与伪随机
不对称才是美?不对称才是美?!所以元就在树的节点位置加入了伪随机扰动。

“说点什么好呢?”
第四章 更多的子树
元一直认为这个世界有时候是需要偏见的,二叉树肯定是最好的树。
虽然现在不止两个子树。

“高清大图才能欣赏的过瘾。”你可以尝试目标另存为。
第五章 绿叶与果实
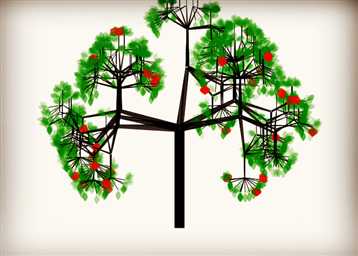
在树的末梢长出叶子和果实,一颗树终于成型了。

“对暗黄系简直审美疲劳,画风是该换一换了。”
“结束了,据说第六天还要加班造人?!”
后记
-- 亚,我饿了
-- 夏,我去给你摘果子
...
-- 亚,那个猿又在树上看着我们
-- 别管Ta,吃果子咯
-- 嗯哪
...
...
-- 夏,我一直以为那是只狗呢
...

    Dim ph As Graphics
    Dim PaintBoard As Bitmap
    Dim centerX, centerY As Long
    Dim modeSequence() As Integer = {4, 5, 4, 6, 5, 6, 1, 2, 1, 3, 2, 3}
    Dim rnd As New Random
    Public Function Calculator(ByVal x As Double, ByVal y As Double, ByVal mode As Integer, ByVal r As Double, ByVal depth As Integer, ByVal radio As Double) As Double()
        Dim R2 As Double
        r = r * radio
        R2 = Math.Sqrt(3) * (r / 2)
        Dim Position(2) As Double
        Dim tempRnd As Double = 1 ‘* rnd.Next(depth, 20) / 10
        If mode = 1 Then
            x = 0 : y = -r * tempRnd
        ElseIf mode = 2 Then
            x = -R2 * tempRnd : y = (r / 2) * tempRnd
        ElseIf mode = 3 Then
            x = R2 * tempRnd : y = (r / 2) * tempRnd
        ElseIf mode = 4 Then
            x = -R2 * tempRnd : y = -(r / 2) * tempRnd
        ElseIf mode = 5 Then
            x = R2 * tempRnd : y = -(r / 2) * tempRnd
        ElseIf mode = 6 Then
            x = 0 : y = r * tempRnd
        End If
        Position(0) = x
        Position(1) = y
        Position(2) = r
        Return Position
    End Function
    Public Sub PaintLine(ByVal x As Double, ByVal y As Double, ByVal mode As Integer, ByVal r As Double, ByVal depth As Integer, ByVal radio As Double)
        Dim position() As Double
        Dim tempR As Double
        Dim tempWidth As Double
        Dim tempColor As Color
        Dim tempRnd As Integer = rnd.Next(1, 3)
        Dim tempAlpha As Integer
        For j = 0 To 1
            For pff = 0 To tempRnd
                position = Calculator(x, y, modeSequence((mode - 1) * 2 + j), r, depth, radio)
                Dim LineVector As New Vector2D(position(0), position(1))
                LineVector.x *= rnd.NextDouble
                LineVector.y *= rnd.NextDouble
                LineVector.SetMag(IIf(depth <= 1, 20, position(2)))
                position(0) = LineVector.x
                position(1) = LineVector.y
                Dim tempMag As Double = LineVector.Magnitude
                Dim PointList As New List(Of PointF)
                For m = 1 To tempMag
                    LineVector.SetMag(m)
                    PointList.Add(New PointF(x + LineVector.x, y + LineVector.y))
                Next
                If PointList.Count >= 2 Then
                    Dim tempNext As Double = rnd.NextDouble
                    tempAlpha = rnd.Next(20, 100)
                    For p = 0 To PointList.Count - 2
                        tempR = r * 0.015 * depth
                        tempWidth = IIf(depth <= 1, Math.Sin(p / 6) * 10, tempR - p / PointList.Count * (tempR - tempR * radio + r * 0.015 * radio))
                        tempColor = IIf(depth <= 1, Color.FromArgb(tempAlpha, Color.Green), Color.Black)
                        If depth <= 1 Then
                            If tempNext < 0.01 Then
                                tempWidth = Math.Sin(p / 6) * 20
                                tempColor = Color.FromArgb(rnd.Next(200, 255), Color.Red)
                            End If
                        End If
                        ph.DrawLine(New Pen(tempColor, tempWidth), PointList(p), PointList(p + 1))
                    Next
                End If
                PaintHexgon(position(0) + x, position(1) + y, modeSequence((mode - 1) * 2 + j), tempMag, depth - 1, radio)
            Next
        Next
    End Sub
    Public Sub PaintHexgon(ByVal x As Double, ByVal y As Double, ByVal mode As Integer, ByVal r As Double, ByVal depth As Integer, ByVal radio As Double)
        If depth > 0 Then
            If mode = 0 Then
                ph.DrawLine(New Pen(Brushes.Black, r * 0.02 * depth), New PointF(x, y), New PointF(x, y + r))
                PaintLine(x, y, 1, r, depth, radio)
            Else
                PaintLine(x, y, mode, r, depth, radio)
            End If
        End If
    End Sub
    ‘画树
    Private Sub Button2_Click(ByVal sender As System.Object, ByVal e As System.EventArgs) Handles Button2.Click
        PaintBoard = New Bitmap(PictureBox1.Width, PictureBox1.Height)
        ph = Graphics.FromImage(PaintBoard)
        ph.SmoothingMode = Drawing2D.SmoothingMode.AntiAlias
        centerX = PictureBox1.Width / 2 : centerY = PictureBox1.Height / 2
        PaintHexgon(centerX, centerY, 0, 200, 5, 0.6180339887)
        ‘ PaintHexgon(centerX, centerY, 0, 20, 5, 1.61812)
        PictureBox1.Image = PaintBoard
    End Sub
标签:
原文地址:http://www.cnblogs.com/experdot/p/4556672.html