标签:
第一步:成生SSH密钥
打开终端命令工具,输入命令:ssh-keygen -t rsa -C "diaosi@gmail.com"
注意ssh-keygen没有空格。屏幕输出:
Generating public/private rsa key pair.
Enter file in which to save the key (/Users/diaosi/.ssh/id_rsa):diaosi
在上方输入生成的密钥文件名,如diaosi,屏幕输出:
Enter passphrase (empty for no passphrase): 输入密码
Enter same passphrase again: 确认密码
Your identification has been saved in diaosi.
Your public key has been saved in diaosi.pub.
The key fingerprint is:
25:fd:01:00:89:98:49:bf:2e:ac:32:2e:d2:5d:bf:98 diaosi@gmail.com
The key‘s randomart image is:
+--[ RSA 2048]----+
| ..+ ..o... |
| +.. . . . |
| . . o . |
| . o . . |
| . S . |
| . . . |
| .o... . |
|=.... o. |
|*o E .. |
+-----------------+
屏幕提示生成密钥文件成功,保存在/Users/diaosi文件夹下。
第二步:把diaosi.pub中的内容加入git@osc 的SSH密钥中
第三步:添加SSH并连接
输入命令:ssh-add ~/diaosi
~/diaosi 是刚刚生成的密钥文件路径,屏幕输出:
Enter passphrase for /Users/diaosi/diaosi:输入密码
Identity added: /Users/diaosi /diaosi (/Users/diaosi /diaosi)
输入命令ssh -T git@git.oschina.net,屏幕输出:
The authenticity of host ‘git.oschina.net (58.215.179.44)‘ can‘t be established.
RSA key fingerprint is 14:b8:b8:0b:c2:b2:5e:ae:f2:21:f8:18:4d:3a:be:fc.
Are you sure you want to continue connecting (yes/no)? yes(输入yes),屏幕输出:
Warning: Permanently added ‘git.oschina.net,58.215.179.44‘ (RSA) to the list of known hosts.
Welcome to Git@OSC , 老左!
第四步:设置个人信息
输入命令:
git config –global user.name “diaosi”
git config –global user.email diaosi@gmail.com
第五步:设置项目
获取git@osc 上的项目路径。
输入命令:cd 项目文件夹
输入命令:git remote add origin git@git.oschina.net:heqings/fitness.git
输入命令:git pull -u origin master //从git@osc 上拉取项目
输入命令:git push -u origin master //提交项目
第六步:Xcode集成
在Xcode中,提交代码到git@osc 前需提交到本地git,否则Xcode会提示你。
在项目或文件上选择文件提交到本地,这里需要注意的是,工程用户数据不要提交到git,因它实时在变化,本地和远程都不要提交,否则Push时提示有文件未提交。
以上文件不要提交。
把项目提交到本地:
File->Source Control->Commit
把项目提交到git@osc :
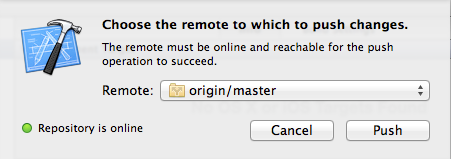
File->Source Control->Push

点击Push按钮即可。
Xcode连接git@osc (oschina git代码托管)
标签:
原文地址:http://www.cnblogs.com/hanzhuzi/p/4572112.html