标签:
【前言和思路整理】
千呼万唤Shǐ出来!终于到最后一章啦~
很抱歉这一章卡了那么久才发布。主要原因是家里电脑主板的内存插槽炸了,返厂后这周才收到,平时在公司也基本没什么时间写……再次表示歉意。
上一章我们实现了用户输入、打击判定和音效播放的功能,让游戏可以玩起来了。这一章我们加上一些附属的UI和特效,把游戏界面做完善。
本章的难点是没有什么难点,基本上是往现有功能上做一些简单的添砖加瓦。在这一章中,我们需要实现如下功能:
1、分数的显示
2、Combo数和打击判定的显示
3、打击特效
4、弹出对话框的实现
本章的模块设计简图如下:
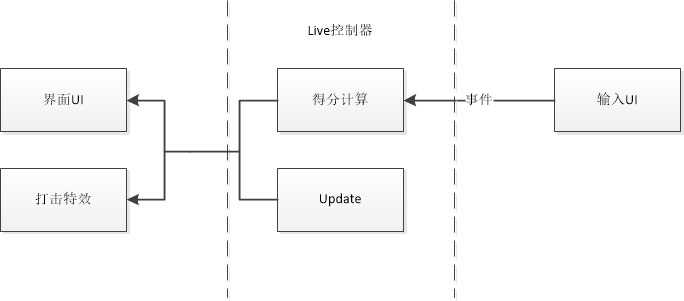
要实现的功能不多,主要需求为图像资源。对话框是一个较为独立的低耦合模块,就不放在设计图中了。
【UI层分析与制作】
以一张游戏的截图来分析,UI层包含这些东西:
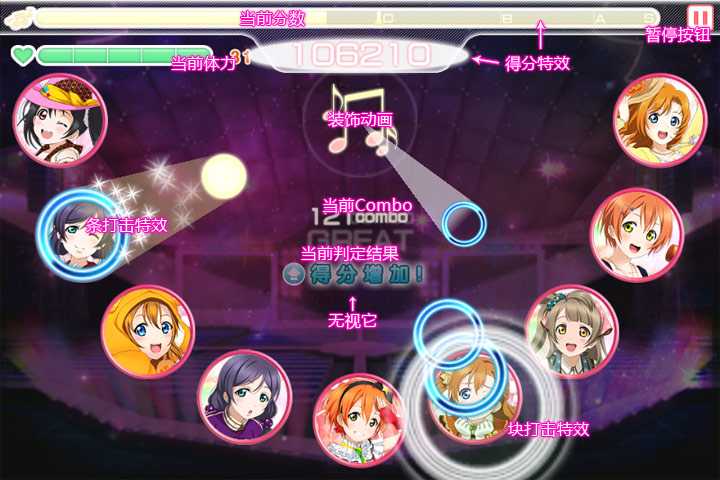
图中的“得分增加”是卡牌技能触发的表现,这个项目中不会有,就无视掉吧。
这些玩意都是用CocoStudio可以直接制作的。于是打开CocoStudio的UI Editor(貌似官方都发布2.x的版本了?我这个还是1.6的落后版),然后把资源拖进去拼好:
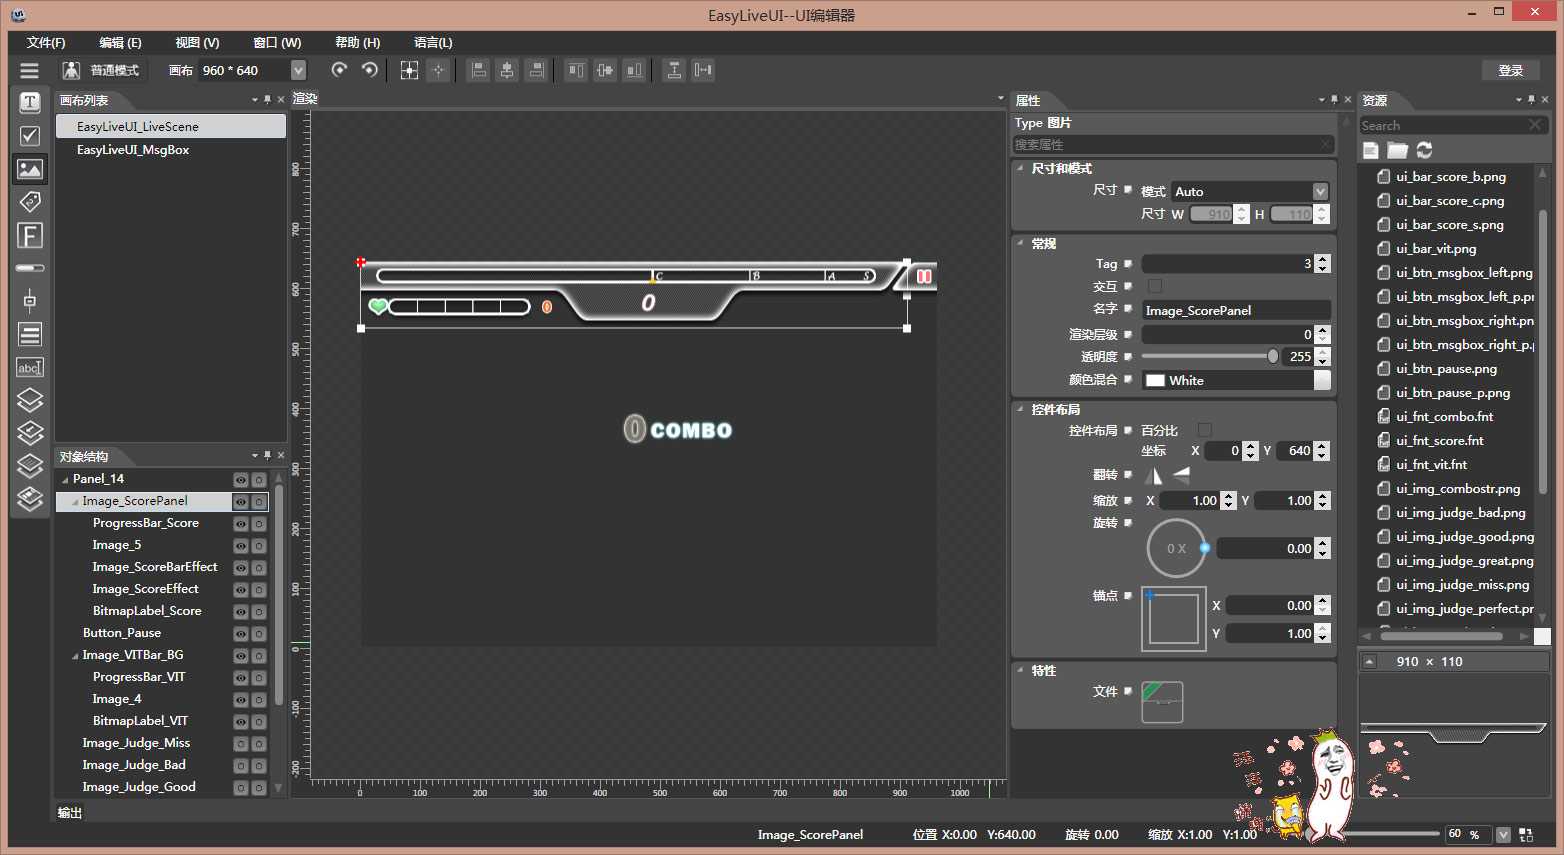
★Cocos2d-x 3.2有个不知道算不算Bug的问题:如果UI层的“交互”选项被勾上了,那么这个UI层会吞噬掉所有的触摸消息。所以这里需要把LiveScene画布的Panel_14层的“交互”的钩去掉。
注意画布大小设置为960×640。打击判定和得分特效都在这里,只是被隐藏了。本文最后的附件中会附上UI工程文件。为了表示我用的资源不是从LL里解密出来的,这里的UI和LL的稍微有一些差别。
还有一点是分数条和血条在不同数值的时候颜色不同,需要根据当前进度条的百分比更换材质。更换材质的功能由代码完成,所以UI编辑器不会用到条的不同颜色的资源,所以最后将工程导出的时候需要把没有添加到界面上的图像也打进去。用CocoStudio的“导出全部大图”会把fnt图字的资源也打进去,所以推荐使用Texture Packer,手动把要打包的图整合出来。如何使用Texture Packer在后文中有讲解。
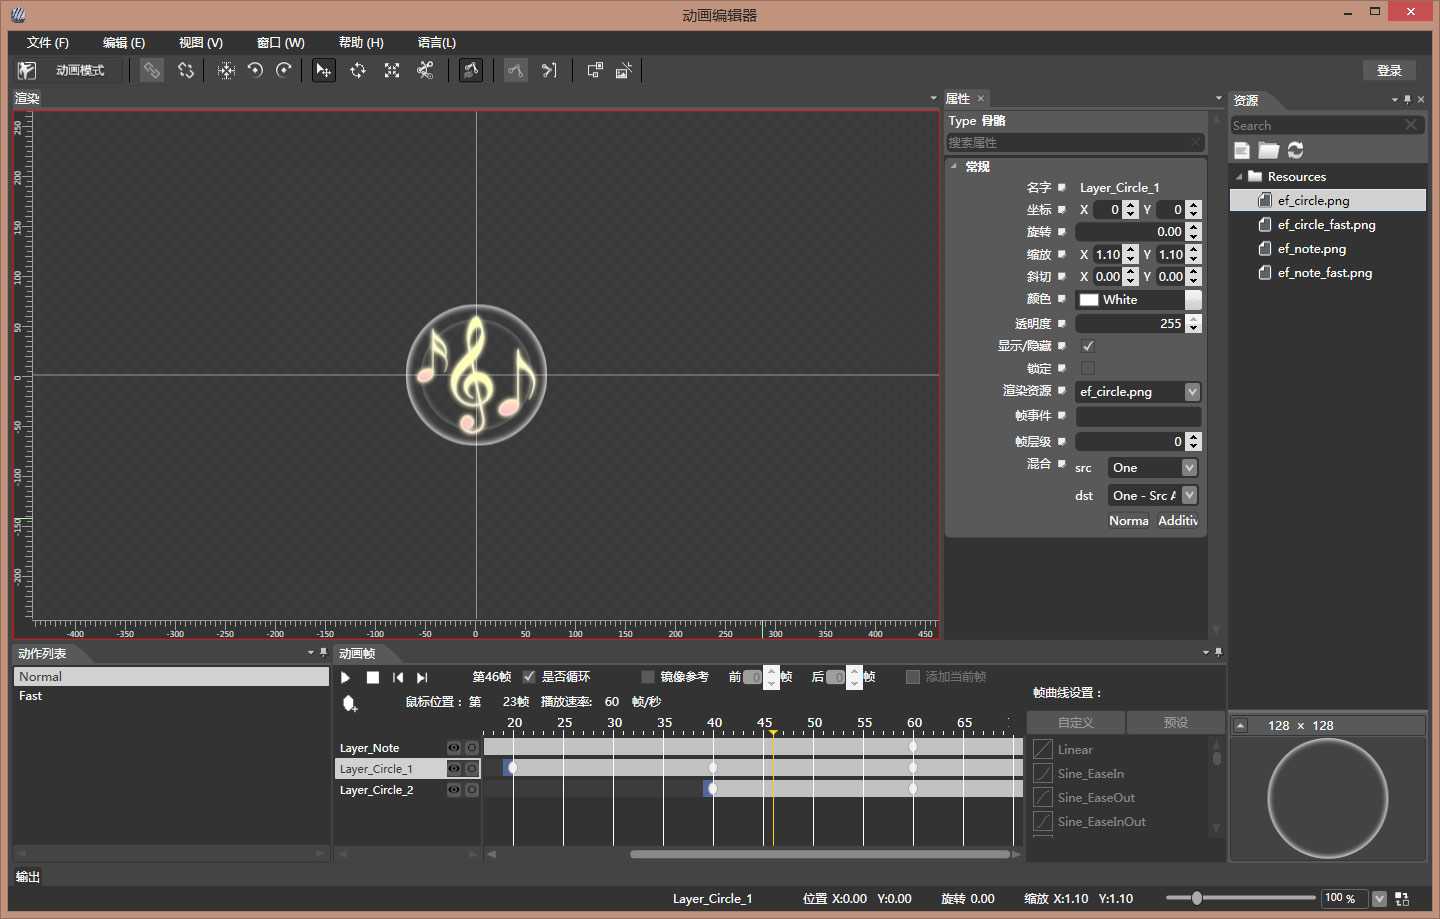
中间的装饰动画用CocoStudio的AnimationEditor制作(体力值过低的时候动画会变,所以动作列表中有两个):
从第二章的视频中可以看到Combo数变化、分数变化时,得分特效会播放,“Combo”字符、数字和得分判定都会发生缩放和透明度变化。虽然可以用ScaleTo + FadeOut来实现,但是每当一个Action创建时,Cocos2d-x底层就会创建一个线程(看VS的输出窗口)。如果物件比较密集,就会频繁地改变Combo数,进而频繁地创建和销毁线程。要尽量避免这样的操作。所以对于物件的缩放、淡出处理都放在Update方法中,不会有线程开销。所以应当将这些操作放在主线程中,不使用Action。打击判定的图像和得分特效也是同理。于是可以在项目中添加LiveSceneUI类,绑定控件留出接口。
绑定控件时,Cocos2d-x默认的GetChildrenByName只能找当前结点的一级子节点,要找子节点的子节点就得写链式调GetChildrenByName的代码,感觉略蛋疼。所以这里借鉴Unity3D中的Transform.Find方法的模式(Find方法的字符串参数可以是"a/b/c"这样像文件路径的格式),封装了一个类似的方法。这个方法放在Common.h中:
inline cocos2d::Node* Find(cocos2d::Node* pParent, const std::string& pName)
{
    std::vector<std::string> nameList;
    // 以‘/‘号分割字符串
    //
    size_t last = 0;
    size_t index = pName.find_first_of("/", last);
    while (index != std::string::npos)
    {
        nameList.push_back(pName.substr(last, index - last));
        last = index + 1;
        index = pName.find_first_of("/", last);
    }
    if (index - last > 0)
    {
        nameList.push_back(pName.substr(last, index - last));
    }
    // 查找子节点
    //
    auto ret = pParent;
    for (int i = 0; i < nameList.size(); i++)
    {
        ret = ret->getChildByName(nameList.at(i));

        if (ret == nullptr)
        {
            std::ostringstream oss;
            oss << "Child: ";

            for (int j = 0; j <= i; j++)
            {
                oss << nameList.at(j) << "/";
            }
            oss << " Not found";

            cocos2d::log(oss.str().c_str());
            return ret;
        }
    }

    return ret;
}
接下来编写LiveSceneUI的代码。我们不希望在游戏暂停的时候特效还在继续播放,所以需要提供一个接口供LiveController的暂停和继续放方法中使用。代码如下:
#ifndef __LIVE_SCENE_UI_H__
#define __LIVE_SCENE_UI_H__

#include "cocos2d.h"
#include "ui/CocosGUI.h"
#include "editor-support/cocostudio/CocoStudio.h"
#include "HitJudger.h"

USING_NS_CC;
using namespace cocos2d::ui;
using namespace cocostudio;


class LiveSceneUI : public Layer
{
public:
    CREATE_FUNC(LiveSceneUI);
    ~LiveSceneUI(){}

public:
    void SetScore(int pValue, float pPercent, bool pShowEffect = true);
    void SetVIT(int pValue, float pPercent);
    void SetCombo(int pValue);
    void SetJudgement(const HitJudgeType& pValue);

public:
    void Pause();
    void Resume();

public:
    void UpdateUI();

private:
    LiveSceneUI();

private:
    bool init();
    void PauseOnClicked(Ref* sender, Widget::TouchEventType type);

private:
    // 分数
    //
    LoadingBar* m_pBar_Score;
    TextBMFont* m_pText_Score;
    ImageView*  m_pImageView_ScoreBarEffect;
    ImageView*  m_pImageView_ScoreEffect;
    // 体力
    //
    LoadingBar* m_pBar_VIT;
    TextBMFont* m_pText_VIT;
    ImageView*  m_pImageView_VIT;
    // Combo数
    //
    TextBMFont* m_pText_Combo;
    ImageView*  m_pImageView_Combo;
    // 打击判定
    //
    ImageView*  m_pImageView_Perfect;
    ImageView*  m_pImageView_Great;
    ImageView*  m_pImageView_Good;
    ImageView*  m_pImageView_Bad;
    ImageView*  m_pImageView_Miss;
    // 装饰动画
    //
    Armature*   m_pArmature_Ornament;

private:
    ImageView*  m_pImageView_CurJudge;

    GLubyte m_nEffectAlpha;
    GLubyte m_nJudgeAlpha;
    float m_fComboScale;
    std::string m_LastScoreBar;
    int m_nLastOrnIndex;
    bool m_bIsPausing;
};

#endif // __LIVE_SCENE_UI_H__
实现:
#include "LiveSceneUI.h"
#include "GameModule.h"
#include "Common.h"

#define ORNAMENT_INDEX_NORMAL 0
#define ORNAMENT_INDEX_FAST 1


LiveSceneUI::LiveSceneUI()
    : m_pImageView_CurJudge(nullptr)
    , m_nEffectAlpha(0)
    , m_nJudgeAlpha(0)
    , m_fComboScale(1)
    , m_LastScoreBar("ui_bar_score_c.png")
    , m_nLastOrnIndex(ORNAMENT_INDEX_NORMAL)
    , m_bIsPausing(false)
{
}


bool LiveSceneUI::init()
{
    if (!Layer::init())
    {
        return false;
    }
    // 音符装饰动画
    //
    ArmatureDataManager::getInstance()->addArmatureFileInfo("UI/UIOrnament/UIOrnament.ExportJson");
    this->m_pArmature_Ornament = Armature::create("UIOrnament");
    this->m_pArmature_Ornament->setPosition(Vec2(480, 480));
    this->addChild(this->m_pArmature_Ornament);
    this->m_pArmature_Ornament->getAnimation()->playWithIndex(ORNAMENT_INDEX_NORMAL);
    // UI控件
    //
    auto uiWidget = GUIReader::getInstance()->widgetFromJsonFile("UI/EasyLiveUI_LiveScene.ExportJson");
    this->addChild(uiWidget);

    this->m_pBar_Score = (LoadingBar *)Find(uiWidget, "Image_ScorePanel/ProgressBar_Score");
    this->m_pBar_VIT = (LoadingBar *)Find(uiWidget, "Image_VITBar_BG/ProgressBar_VIT");
    this->m_pText_Score = (TextBMFont *)Find(uiWidget, "Image_ScorePanel/BitmapLabel_Score");
    this->m_pText_VIT = (TextBMFont *)Find(uiWidget, "Image_VITBar_BG/BitmapLabel_VIT");
    this->m_pImageView_ScoreBarEffect = (ImageView *)Find(uiWidget, "Image_ScorePanel/Image_ScoreBarEffect");
    this->m_pImageView_ScoreEffect = (ImageView *)Find(uiWidget, "Image_ScorePanel/Image_ScoreEffect");

    this->m_pImageView_Perfect = (ImageView *)Find(uiWidget, "Image_Judge_Perfect");
    this->m_pImageView_Great = (ImageView *)Find(uiWidget, "Image_Judge_Great");
    this->m_pImageView_Good = (ImageView *)Find(uiWidget, "Image_Judge_Good");
    this->m_pImageView_Bad = (ImageView *)Find(uiWidget, "Image_Judge_Bad");
    this->m_pImageView_Miss = (ImageView *)Find(uiWidget, "Image_Judge_Miss");
    this->m_pText_Combo = (TextBMFont *)Find(uiWidget, "BitmapLabel_Combo");
    this->m_pImageView_Combo = (ImageView *)Find(uiWidget, "Image_Combo");

    auto pauseBtn = (Button *)Find(uiWidget, "Button_Pause");
    pauseBtn->addTouchEventListener(CC_CALLBACK_2(LiveSceneUI::PauseOnClicked, this));

    return true;
}


void LiveSceneUI::SetScore(int pValue, float pPercent, bool pShowEffect)
{
    std::ostringstream oss;
    oss << pValue;
    this->m_pText_Score->setString(oss.str());

    std::string newBar;
    if (pPercent < 55)
    {
        newBar = "ui_bar_score_c.png";
    }
    else if (pPercent < 75)
    {
        newBar = "ui_bar_score_b.png";
    }
    else if (pPercent < 90)
    {
        newBar = "ui_bar_score_a.png";
    }
    else
    {
        newBar = "ui_bar_score_s.png";
    }
    if (newBar != this->m_LastScoreBar)
    {
        this->m_LastScoreBar = newBar;
        this->m_pBar_Score->loadTexture(this->m_LastScoreBar, Widget::TextureResType::PLIST);
    }

    if (pShowEffect)
    {
        this->m_pBar_Score->setPercent(pPercent);
        this->m_nEffectAlpha = 255;
    }
}


void LiveSceneUI::SetVIT(int pValue, float pPercent)
{
    std::ostringstream oss;
    oss << pValue;
    this->m_pText_VIT->setString(oss.str());

    this->m_pBar_VIT->setPercent(pPercent);

    auto index = pPercent < 20 ? ORNAMENT_INDEX_FAST : ORNAMENT_INDEX_NORMAL;
    if (this->m_nLastOrnIndex != index)
    {
        this->m_nLastOrnIndex = index;
        this->m_pArmature_Ornament->getAnimation()->playWithIndex(this->m_nLastOrnIndex);
    }
}


void LiveSceneUI::SetCombo(int pValue)
{
    std::ostringstream oss;
    oss << pValue;
    this->m_pText_Combo->setString(oss.str());
}


void LiveSceneUI::SetJudgement(const HitJudgeType& pValue)
{
    if (pValue == HitJudgeType::None)
    {
        return;
    }

    if (this->m_pImageView_CurJudge != nullptr)
    {
        this->m_pImageView_CurJudge->setVisible(false);
    }

    switch (pValue)
    {
    case HitJudgeType::Perfect:
        this->m_pImageView_CurJudge = this->m_pImageView_Perfect;
        break;

    case HitJudgeType::Great:
        this->m_pImageView_CurJudge = this->m_pImageView_Great;
        break;

    case HitJudgeType::Good:
        this->m_pImageView_CurJudge = this->m_pImageView_Good;
        break;

    case HitJudgeType::Bad:
        this->m_pImageView_CurJudge = this->m_pImageView_Bad;
        break;

    case HitJudgeType::Miss:
        this->m_pImageView_CurJudge = this->m_pImageView_Miss;
        break;
    }

    this->m_pImageView_CurJudge->setVisible(true);
    this->m_nJudgeAlpha = 255;
    this->m_fComboScale = 1.4f;
}


void LiveSceneUI::Pause()
{
    this->m_bIsPausing = true;
    this->m_pArmature_Ornament->getAnimation()->pause();
}


void LiveSceneUI::Resume()
{
    this->m_bIsPausing = false;
    this->m_pArmature_Ornament->getAnimation()->resume();
}


void LiveSceneUI::UpdateUI()
{
    if (this->m_bIsPausing)
    {
        return;
    }
    // 打击判定
    //
    if (this->m_pImageView_CurJudge != nullptr)
    {
        this->m_pImageView_CurJudge->setOpacity(this->m_nJudgeAlpha);
        this->m_nJudgeAlpha = this->m_nJudgeAlpha - 2 > 0 ? this->m_nJudgeAlpha - 2 : 0;
    }
    // Combo缩放
    //
    this->m_pImageView_Combo->setScale(this->m_fComboScale);
    this->m_pText_Combo->setScale(this->m_fComboScale);
    this->m_fComboScale = this->m_fComboScale - 0.02f > 1 ? this->m_fComboScale - 0.02f : 1;
    // 得分特效
    //
    this->m_pImageView_ScoreEffect->setOpacity(this->m_nEffectAlpha);
    this->m_pImageView_ScoreBarEffect->setOpacity(this->m_nEffectAlpha);
    this->m_nEffectAlpha = this->m_nEffectAlpha - 2 > 0 ? this->m_nEffectAlpha - 2 : 0;
}


void LiveSceneUI::PauseOnClicked(Ref* sender, Widget::TouchEventType type)
{
    if (type == Widget::TouchEventType::ENDED)
    {
        GameModule::GetLiveController()->PauseLive();
        GameModule::GetMsgBox()->Show(
            "Restart Live?",
            "NO", []()
                  {
                      GameModule::GetLiveController()->ResumeLive();
                  },
            "YES", []()
                  {
                      GameModule::GetLiveController()->RestartLive();
                  });
    }
}
★需要添加libCocosStudio项目(位于解决方案目录\cocos2d\cocos\editor-support\cocostudio\下,根据目标平台选择)到工程中。
★体力值进度条的换材质方法和分数进度条一样,我是懒逼就没加了,代码中只做了分数进度条换材质。
【打击特效的实现】
圈和条的打击特效是帧动画,前者不循环,后者无限循环。于是使用CocoStudio的AnimationEditor制作它们。
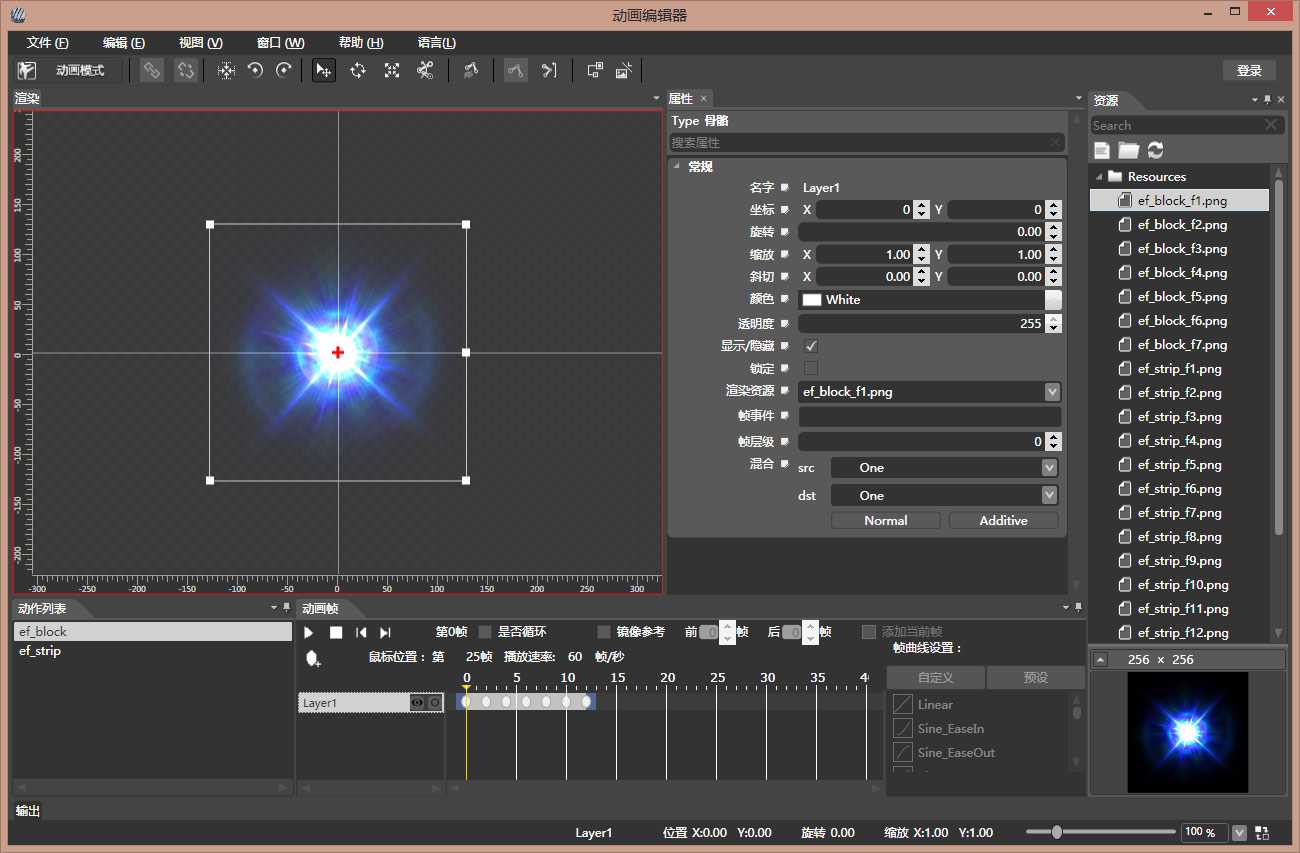
我对特效制作实在苦手,只能从别的地方提取资源了。这里使用的资源提取自《节奏大师》的资源包。因为《节奏大师》使用的资源背景是黑色的,所以每一帧的混合模式的两项都要设为One,这样就没有黑色背景了。
如果短时间出现了两个物件,也就是在前一个特效播放结束前需要播放第二个特效,这时把第一个特效停掉是不明智,也是影响视觉效果的。特效属于Armature类,这个类在实例化前要求预加载资源。而资源加载后,类的实例化速度是非常快的。所以这里可以采用需要播放特效的时候create一个的做法。但是如果我们不断使用create-addChild的方法,必然会导致内存占用越来越大。所以我们需要设置让特效停止播放的时候(块特效为播放结束时,条特效为外接操作停止时)把特效从它的父节点上remove掉。
由于特效只会在九个圆形按钮的位置出现,所以应当创建九个Node作为特效的父节点方便进行添加和移除管理。而对外部来说,只需要播放块特效、播放条特效和停止条特效三个接口即可。同LiveSceneUI类一样,这个类也要提供Pause和Resume接口。
添加EffectLayer类:
#ifndef __HIT_EFFECT_H__
#define __HIT_EFFECT_H__

#include "cocos2d.h"
#include "editor-support/cocostudio/CocoStudio.h"

USING_NS_CC;
using namespace cocostudio;

class HitEffect : public Node
{
public:
    void PlayBlockEffect(int pColume);
    void PlayStripEffect(int pColume);
    void StopStripEffect(int pColume);

public:
    void Pause();
    void Resume();

public:
    CREATE_FUNC(HitEffect);

private:
    HitEffect(){}
    bool init();

private:
    Node* m_PosList[9];
};

#endif // __HIT_EFFECT_H__
实现:
#include "HitEffect.h"

#define EFFECT_NAME "Effect_BeatObject"
#define BLOCK_INDEX 0
#define STRIP_INDEX 1


bool HitEffect::init()
{
    if (!Node::init())
    {
        return false;
    }

    ArmatureDataManager::getInstance()->addArmatureFileInfo(EFFECT_NAME"/"EFFECT_NAME".ExportJson");

    for (int i = 0; i < 9; i++)
    {
        auto node = Node::create();
        auto rad = CC_DEGREES_TO_RADIANS(22.5f * i + 180);
        node->setPosition(400 * cos(rad), 400 * sin(rad));
        this->addChild(node);

        this->m_PosList[i] = node;
    }

    return true;
}


void HitEffect::PlayBlockEffect(int pColume)
{
    auto effect = Armature::create(EFFECT_NAME);
    effect->setTag(BLOCK_INDEX);
    // 播放结束后从父节点中移除
    //
    effect->getAnimation()->setMovementEventCallFunc([this](Armature *armature, MovementEventType movementType, const std::string& movementID)
    {
        if (movementType == MovementEventType::COMPLETE)
        {
            armature->removeFromParent();
        }
    });

    this->m_PosList[pColume]->addChild(effect);
    effect->getAnimation()->playWithIndex(BLOCK_INDEX);
}


void HitEffect::PlayStripEffect(int pColume)
{
    auto effect = Armature::create(EFFECT_NAME);
    effect->setTag(STRIP_INDEX);
    this->m_PosList[pColume]->addChild(effect);
    effect->getAnimation()->playWithIndex(STRIP_INDEX);
}


void HitEffect::StopStripEffect(int pColume)
{
    auto childList = this->m_PosList[pColume]->getChildren();
    for (int i = childList.size() - 1; i >= 0; i--)
    {
        auto chd = childList.at(i);
        if (chd->getTag() == STRIP_INDEX)
        {
            chd->removeFromParent();
        }
    }
}


void HitEffect::Pause()
{
    for (auto node : this->m_PosList)
    {
        auto childList = node->getChildren();
        for (auto child : childList)
        {
            auto effect = dynamic_cast(child);
            if (effect != nullptr)
            {
                effect->getAnimation()->pause();
            }
        }
    }
}


void HitEffect::Resume()
{
    for (auto node : this->m_PosList)
    {
        auto childList = node->getChildren();
        for (auto child : childList)
        {
            auto effect = dynamic_cast(child);
            if (effect != nullptr)
            {
                effect->getAnimation()->resume();
            }
        }
    }
}
★需要在类初始化时将动画的资源加载进内存。释放资源的方法为ArmatureDataManager::getInstance()->removeArmatureFileInfo("动画文件路径")
【对话框的实现】
对话框的功能是暂时中断游戏进程,向用户展示一些消息,并获取用户的选择以执行对应的逻辑功能的一个控件。这么说的话有点难理解,在Windows编程中,它就是MessageBox,比如这个:
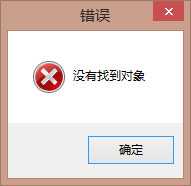
对话框也可以有多个按钮,比如这个:
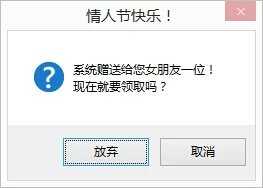
好吧,感觉扯远了。在LL的Live场景中,有三种情况会触发对话框:
1、 玩家手动点击右上角的暂停按钮时
2、 体力变为0时
3、 打完歌曲,提交数据网络中断时
我们的项目是一个单机游戏,所以不需要考虑第三种情况。虽然在目前的需求中,对话框只会在Live场景中出现,但是考虑到万一今后加入了其他功能,也要让对话框可以继续使用,所以对话框模块相对于其他功能的耦合度不能太高。
Cocos2d-x没有对话框组件,需要我们自己写。对话框的UI依然使用CocoStudio制作,在之前的UI项目中新建一个画布,将资源添加上去:
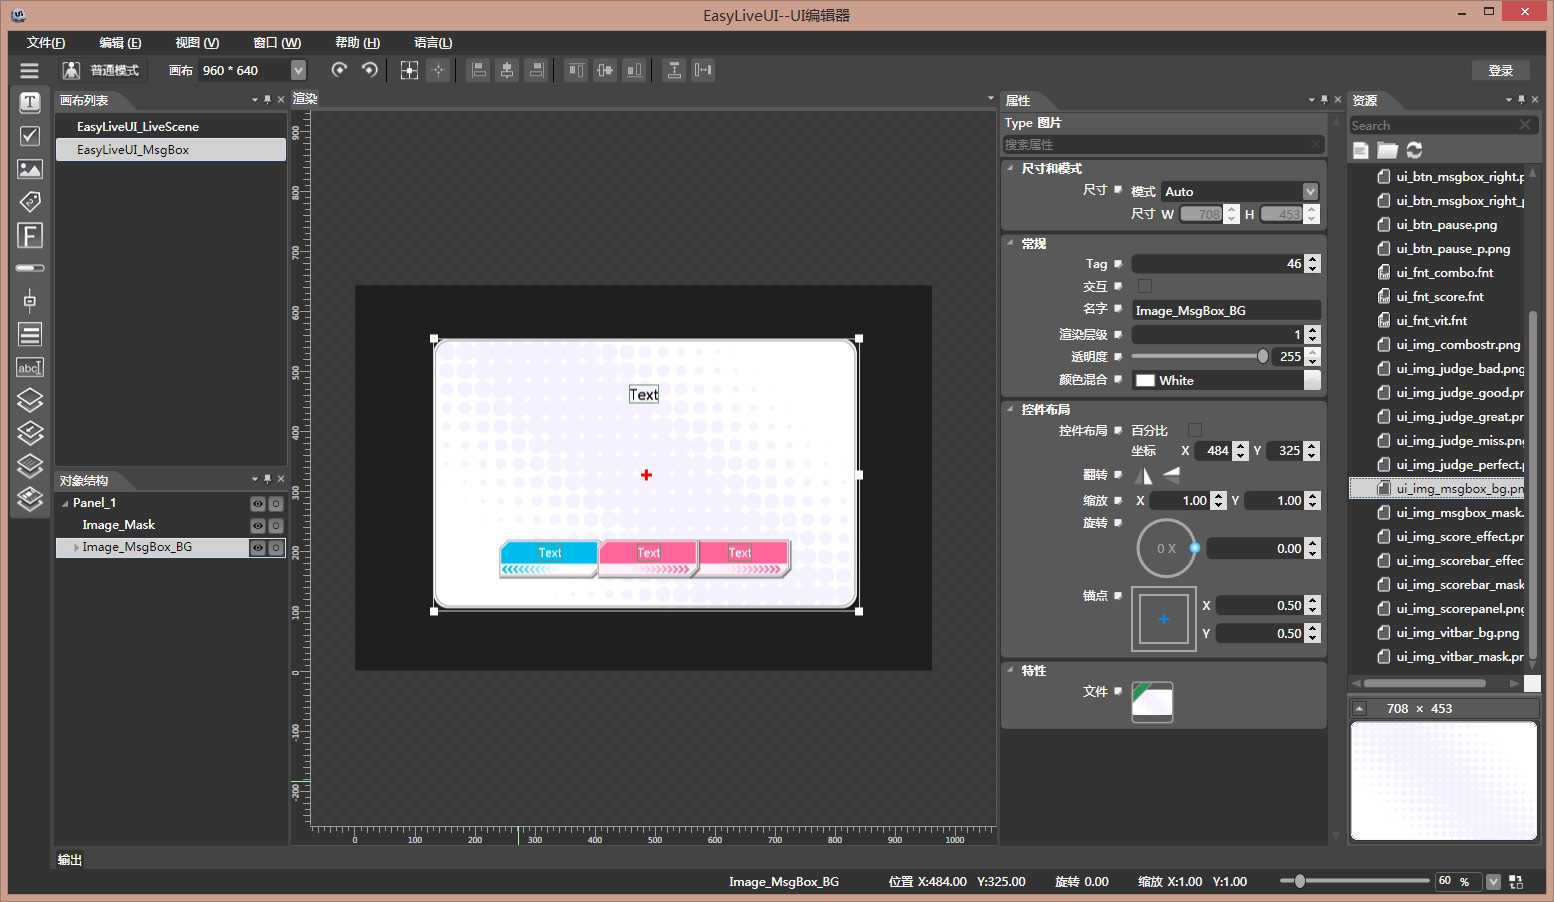
上面放了三个按钮,在代码中控制它们的显示与否。
为了不和Windows API冲突,这个类我们命名为MsgBox。这个类应该公开两个接口,一个用于显示一个按钮的对话框,另一个用于显示两个按钮的对话框。以下是头文件:
#ifndef __MSG_BOX_H__
#define  __MSG_BOX_H__

#include "cocos2d.h"
#include "ui/CocosGUI.h"
#include "editor-support/cocostudio/CocoStudio.h"

USING_NS_CC;
using namespace cocos2d::ui;
using namespace cocostudio;

class MsgBox
{
public:
    MsgBox();
    ~MsgBox();

public:
    /**
     * 显示有两个按钮的对话框
     * @param pContent 文本内容
     * @param pLText 左边按钮文本
     * @param pLCallback 左边按钮点击回调,可以为nullptr
     * @param pRText 右边按钮文本
     * @param pRCallback 右边按钮点击回调,可以为nullptr
     */
    void Show(const std::string& pContent,
        const std::string& pLText, std::function<void()> pLCallback,
        const std::string& pRText, std::function<void()> pRCallback);

    /**
     * 显示只有一个按钮的对话框
     * @param pContent 文本内容
     * @param pMText 按钮文本
     * @param pMCallback 按钮点击回调,可以为nullptr
     */
    void Show(const std::string& pContent,
        const std::string& pText, std::function<void()> pMCallback);

private:
    void Show();
    void Hide();
    void AfterHidden();
    void ButtonClicked(Ref* sender, Widget::TouchEventType type);

private:
    Widget*    m_pUIWidget;
    Text*      m_pText_Content;
    Button*    m_pButton_L;
    Button*    m_pButton_M;
    Button*    m_pButton_R;
    ImageView* m_pImage_MsgBoxBG;
    ImageView* m_pImage_Mask;

private:
    std::function<void()>  m_Button_L_Clicked; // 左边按钮点击回调
    std::function<void()>  m_Button_M_Clicked; // 中间按钮点击回调
    std::function<void()>  m_Button_R_Clicked; // 右边按钮点击回调
    Button*    m_pClickedButton;
};

#endif //  __MSG_BOX_H__
实现:
#include "MsgBox.h"
#include "Common.h"


MsgBox::MsgBox()
    : m_Button_L_Clicked(nullptr)
    , m_Button_M_Clicked(nullptr)
    , m_Button_R_Clicked(nullptr)
    , m_pClickedButton(nullptr)
{
    this->m_pUIWidget = GUIReader::getInstance()->widgetFromJsonFile("UI/EasyLiveUI_MsgBox.ExportJson");
    CC_SAFE_RETAIN(this->m_pUIWidget);

    this->m_pImage_Mask = (ImageView *)Find(this->m_pUIWidget, "Image_Mask");
    this->m_pImage_MsgBoxBG = (ImageView *)Find(this->m_pUIWidget, "Image_MsgBox_BG");
    this->m_pText_Content = (Text *)Find(this->m_pUIWidget, "Image_MsgBox_BG/Label_Content");
    this->m_pButton_L = (Button *)Find(this->m_pUIWidget, "Image_MsgBox_BG/Button_Left");
    this->m_pButton_M = (Button *)Find(this->m_pUIWidget, "Image_MsgBox_BG/Button_Medium");
    this->m_pButton_R = (Button *)Find(this->m_pUIWidget, "Image_MsgBox_BG/Button_Right");

    this->m_pButton_L->addTouchEventListener(CC_CALLBACK_2(MsgBox::ButtonClicked, this));
    this->m_pButton_M->addTouchEventListener(CC_CALLBACK_2(MsgBox::ButtonClicked, this));
    this->m_pButton_R->addTouchEventListener(CC_CALLBACK_2(MsgBox::ButtonClicked, this));

    this->m_pImage_Mask->setOpacity(0);
    this->m_pImage_MsgBoxBG->setScale(0);
}


void MsgBox::Show(const std::string& pContent,
    const std::string& pLText, std::function<void()> pLCallback,
    const std::string& pRText, std::function<void()> pRCallback)
{
    this->m_pText_Content->setString(pContent);

    this->m_pButton_M->setVisible(false);
    this->m_pButton_L->setVisible(true);
    this->m_pButton_R->setVisible(true);

    ((Text *)Find(this->m_pButton_L, "Label"))->setString(pLText);
    ((Text *)Find(this->m_pButton_R, "Label"))->setString(pRText);

    this->m_Button_L_Clicked = pLCallback;
    this->m_Button_R_Clicked = pRCallback;

    this->Show();
}


void MsgBox::Show(const std::string& pContent,
    const std::string& pText, std::function<void()> pMCallback)
{
    this->m_pText_Content->setString(pContent);

    this->m_pButton_M->setVisible(true);
    this->m_pButton_L->setVisible(false);
    this->m_pButton_R->setVisible(false);

    ((Text *)Find(this->m_pButton_M, "Label"))->setString(pText);

    this->m_Button_M_Clicked = pMCallback;

    this->Show();
}


void MsgBox::Show()
{
    Director::getInstance()->getRunningScene()->addChild(this->m_pUIWidget, 127);

    this->m_pImage_Mask->runAction(FadeIn::create(0.2f));
    this->m_pImage_MsgBoxBG->runAction(Sequence::create(
        ScaleTo::create(0.2f, 1.2f),
        ScaleTo::create(0.1f, 1),
        nullptr));
}


void MsgBox::Hide()
{
    this->m_pImage_Mask->runAction(FadeOut::create(0.2f));
    this->m_pImage_MsgBoxBG->runAction(ScaleTo::create(0.2f, 0));
    this->m_pUIWidget->runAction(Sequence::create(
        DelayTime::create(0.2f),
        RemoveSelf::create(),
        CallFunc::create(CC_CALLBACK_0(MsgBox::AfterHidden, this)),
        nullptr));
}


void MsgBox::AfterHidden()
{
    std::function<void()> callFunc = nullptr;

    if (this->m_pClickedButton == this->m_pButton_L)
    {
        callFunc = this->m_Button_L_Clicked;
    }
    else if (this->m_pClickedButton == this->m_pButton_M)
    {
        callFunc = this->m_Button_M_Clicked;
    }
    else if (this->m_pClickedButton == this->m_pButton_R)
    {
        callFunc = this->m_Button_R_Clicked;
    }

    if (callFunc != nullptr)
    {
        callFunc();
    }
}


void MsgBox::ButtonClicked(Ref* sender, Widget::TouchEventType type)
{
    if (type == Widget::TouchEventType::ENDED)
    {
        this->m_pClickedButton = (Button *)sender;
        this->Hide();
    }
}


MsgBox::~MsgBox()
{
    CC_SAFE_RELEASE(this->m_pUIWidget);
}
★Director::getInstance()->getRunningScene()->addChild(this->m_pUIWidget, 127)这一行表明了MsgBox显示的层级为127。如果当前场景中有ZOrder大于127的节点,该节点会显示在MsgBox层上。在设计程序的时候要注意不要出现层级大于127的结点。
【数值计算的实现】
在LL中,玩家的分数、体力和自己所选用的卡牌(那九个圆形按钮)的数值有关。在我们的项目中,和卡牌相关的部分都被砍掉了。分数和体力的数值仅和两个玩意挂钩:一是谱面本身,二是玩家打出的判定。
严格地讲,判定和分数这类逻辑都应该写在脚本里。这里如果要用脚本的话又得加入脚本解析库。想想项目的代码都挺多了,于是果断地偷个懒,把这些都写死在代码里面。
总分就是判定过的物件分数的和。物件分数的计算我使用一个简单公式得到:
物件分数 = 判定分数 × 当前Combo加成
其中,判定分数是一个映射:
●Perfect = 500
●Great = 300
●Good = 100
●Bad = 50
●Miss = 0
而当前Combo加成 = 当前Combo数 / 100。
这个算法是我随手编的,和LL的算法不同。由于这一部分属于可以随意改变的部分,就不去深究LL的加分到底是怎么计算的了。
而Combo和体力数什么时候变化呢?用一个流程图来表示就是:
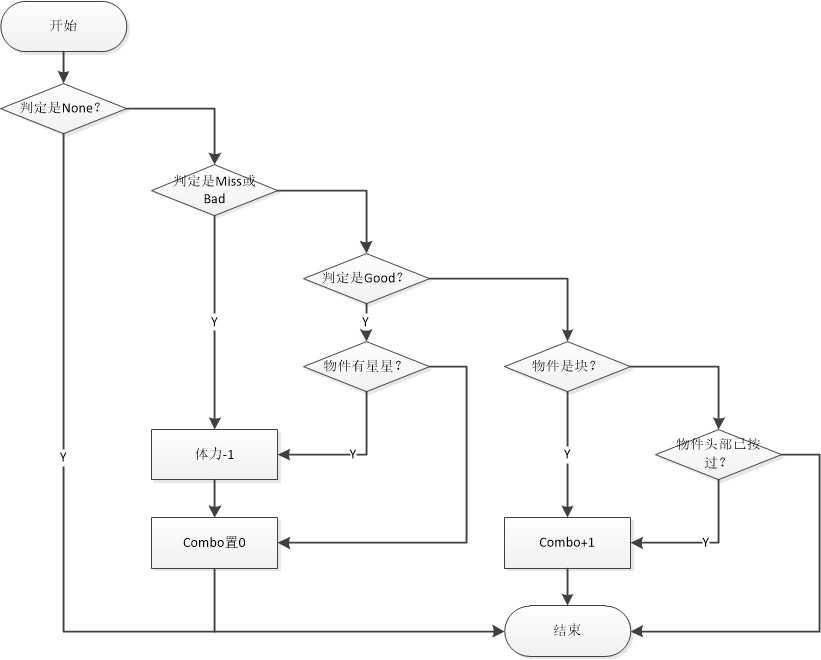
那么可以开始编写代码了。这一部分功能直接放在LiveController类中即可:
void LiveController::ComputeScore(const HitJudgeType& pType, const BeatObjectData* pObj)
{
    if (pType == HitJudgeType::None)
    {
        return;
    }
    // 计算物件分数
    //
    int objScore = 0;
    switch (pType)
    {
    case HitJudgeType::Perfect:
        objScore = 500;
        break;

    case HitJudgeType::Great:
        objScore = 300;
        break;

    case HitJudgeType::Good:
        objScore = 100;
        break;

    case HitJudgeType::Bad:
        objScore = 50;
    }
    // 计算Combo数和体力
    //
    bool vitChanged = false;
    if (pType == HitJudgeType::Bad || pType == HitJudgeType::Miss)
    {
        this->m_nCombo = 0;
        this->m_nVitality--;
        vitChanged = true;
    }
    else if (pType == HitJudgeType::Good)
    {
        if (pObj->Star)
        {
            this->m_nVitality--;
            vitChanged = true;
        }
        this->m_nCombo = 0;
    }
    else
    {
        if (pObj->Type == BeatObjectType::Strip)
        {
            if (pObj->HeadHitted)
            {
                this->m_nCombo += 1;
            }
        }
        else
        {
            this->m_nCombo += 1;
        }
    }
    // 计算总分数
    //
    this->m_nScore += objScore * (1 + m_nCombo / 100.0f);
    // UI表现
    //
    this->m_pLiveSceneUI->SetCombo(this->m_nCombo);
    if (objScore > 0)
    {
        this->m_pLiveSceneUI->SetScore(this->m_nScore, this->m_nScore > 400000 ? 100 : this->m_nScore / 4000.0f);
    }
    this->m_pLiveSceneUI->SetJudgement(pType);
    if (vitChanged)
    {
        this->m_pLiveSceneUI->SetVIT(this->m_nVitality);
    }
    // 如果体力为零则终止游戏并弹出对话框
    //
    if (this->m_nVitality == 0)
    {
        this->PauseLive();
        GameModule::GetMsgBox()->Show(
            "All of your vitalities have been consumed.\r\nPlease restart the live.",
            "OK",
            [this]()
            {
                this->RestartLive();
            });
        return;
    }
}
★对话框显示的文本内容应当放在配置或脚本中。这里偷懒使用硬编码。因为源文件的编码原因直接使用中文会出现乱码,所以这里使用英文。
【功能整合】
最后是将上面写的功能整合起来。在整理前我们先将所有的UI和动画工程导出。
导出后,使用Texture Packer将UI中使用到的图像资源(不包括图字)打包。其实就是把需要打包的图片拖进Texture Packer然后点“Publish”按钮。左边“Output”选项中,“Data Format”要选为“cocos2d”:
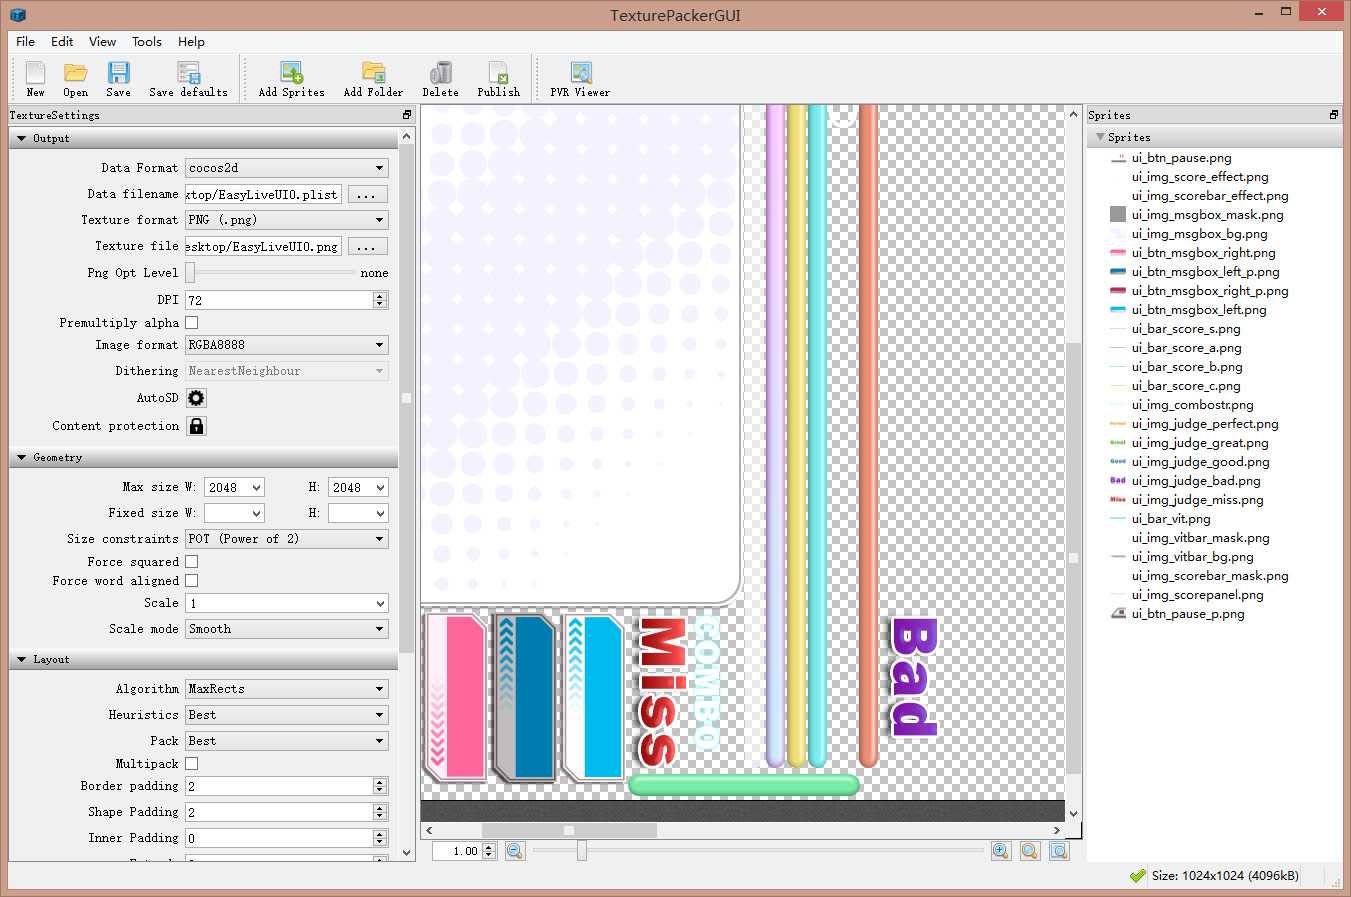
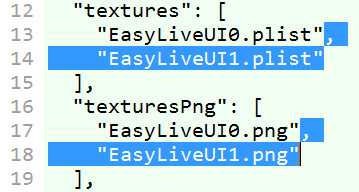
Texture Packer的整合算法优于CocoStudio,在大部分情况打出的大图尺寸小于CocoStudio的。例如在本项目的UI工程,用CocoStudio按最大1024×1024导出后会生成两个png和两个plst文件,而Texture Packer导出后只有一个。所以要修改一下EasyLiveUI_LiveScene.ExportJson和EasyLiveUI_MsgBox.ExportJson文件,将选中的部分删掉并保存:
然后是代码部分。首先打开SoundSystem类修复一个小Bug,将“PlaySound”方法修改为:
void SoundSystem::PlaySound(Sound* pSound, bool pIsSong, int pColume)
{
    auto result = this->m_pSystem->playSound(
        FMOD_CHANNEL_REUSE,
        pSound,
        false,
        pIsSong ? &this->m_pChannel_Song : &this->m_Channel_HitSound[pColume]);

    ERRCHECK(result);
}
如果不修改,在某些情况下打击音效会占用歌曲音效的音轨导致报错。
GameModule类中加入GetMsgBox的方法,当然别忘了在析构中添加释放的代码。
然后修改LIveController类的代码。类中添加一个SetLiveSceneUI和SetHitEffect的方法,实现和SetBeatObjectManager方法一样:
void SetLiveSceneUI(LiveSceneUI* pLSUI){ this->m_pLiveSceneUI = pLSUI; }
void SetHitEffect(HitEffect* pHE){ this->m_pHitEffect = pHE; }
别忘了添加对应的成员变量。
然后是四个Live控制方法:
void LiveController::StartLive()
{
    this->m_CurStatus = LCStatus::Running;
    GameModule::GetSongSystem()->PlaySong();

    this->m_nScore = 0;
    this->m_nCombo = 0;
    this->m_nVitality = 32;

    this->m_pLiveSceneUI->SetScore(0, 0, false);
    this->m_pLiveSceneUI->SetCombo(0);
    this->m_pLiveSceneUI->SetVIT(32, 100);

    this->m_pHitEffect->Resume();
    this->m_pLiveSceneUI->Resume();
}


void LiveController::PauseLive()
{
    if (this->m_CurStatus == LCStatus::Running)
    {
        this->m_CurStatus = LCStatus::Pausing;
        GameModule::GetSongSystem()->PauseSong();
    }

    this->m_pHitEffect->Pause();
    this->m_pLiveSceneUI->Pause();
}


void LiveController::ResumeLive()
{
    this->m_CurStatus = LCStatus::Running;
    GameModule::GetSongSystem()->ResumeSong();
    this->m_pHitEffect->Resume();
    this->m_pLiveSceneUI->Resume();
}


void LiveController::RestartLive()
{
    GameModule::GetSongSystem()->StopSong();
    GameModule::GetSongData()->ResetHitStatus();
    for (int i = 0; i < 9; i++)
    {
        this->m_CurIndexes[i] = 0;
        this->m_pHitEffect->StopStripEffect(i);
    }
    this->StartLive();
}
如果条物件在按住的时候Miss了,我们不希望特效继续播放,所以在Update方法的Miss判定部分需要添加上停止特效的代码。如果物件Miss了还要改变体力和Combo数:
void LiveController::Update()
{
    // ...
    //
    // Miss判定
    //
    auto curObj = &columeData->at(bottomIndex);
    if (GameModule::GetHitJudger()->JudgeMiss(songData->GetJudgement(), curTime, curObj))
    {
        curObj->Enabled = false;
        GameModule::GetSongSystem()->PlayHitSound(HitJudgeType::Miss, i);
        this->ComputeScore(HitJudgeType::Miss, curObj);
        if (bottomIndex > 0)
        {
            bottomIndex--;
        }
        if (curObj->Type == BeatObjectType::Strip)
        {
            this->m_pHitEffect->StopStripEffect(i);
        }
    }
    //
    // ...
}
而我们在点击的时候,如果判定为非None,需要根据情况播放或停止打击特效。对于条物件,如果第二次判定属于非Miss,则不仅要停止条特效,还要额外播放一下块特效。当然这里也会改变体力和Combo数目:
void LiveController::HitButtonsOnEvent(int pColume, bool pIsPress)
{
    // ...
    //
    if (pIsPress)
    {
        result = judger->JudgeHead(songData->GetJudgement(), curTime, objData);

        if (result != HitJudgeType::None)
        {
            if (objData->Type == BeatObjectType::Block)
            {
                objData->Enabled = false;
                this->m_pHitEffect->PlayBlockEffect(pColume);
            }
            else
            {
                objData->HeadHitted = true;
                this->m_pHitEffect->PlayStripEffect(pColume);
            }
        }
    }
    else if (objData->Type == BeatObjectType::Strip && objData->HeadHitted)
    {
        result = judger->JudgeTail(songData->GetJudgement(), curTime, objData);
        objData->Enabled = false;

        this->m_pHitEffect->StopStripEffect(pColume);
        this->m_pHitEffect->PlayBlockEffect(pColume);
    }

    GameModule::GetSongSystem()->PlayHitSound(result, pColume);
    this->ComputeScore(result, objData);
}
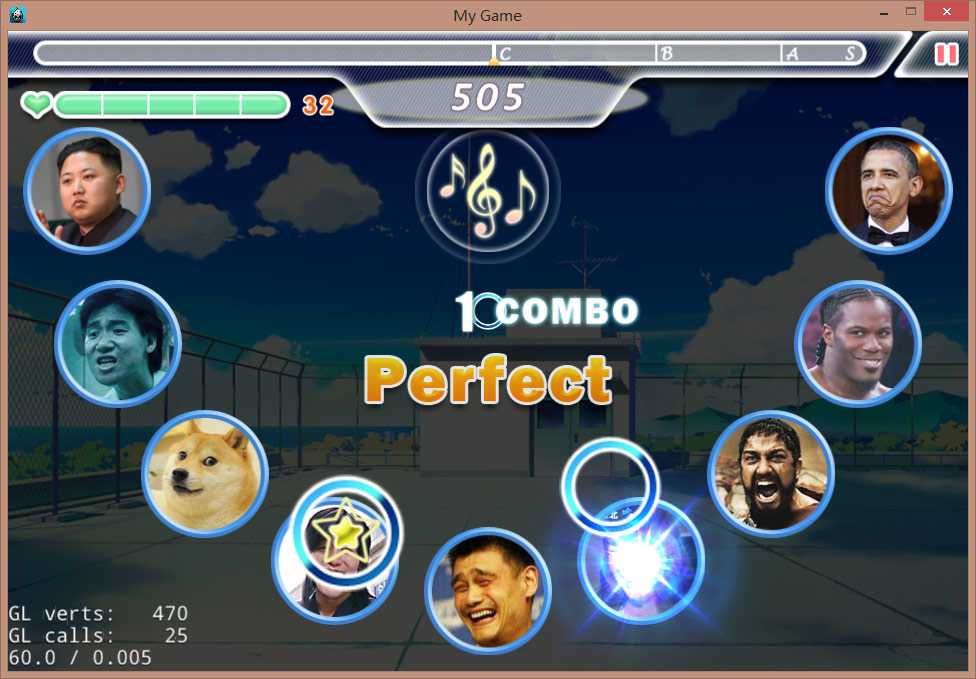
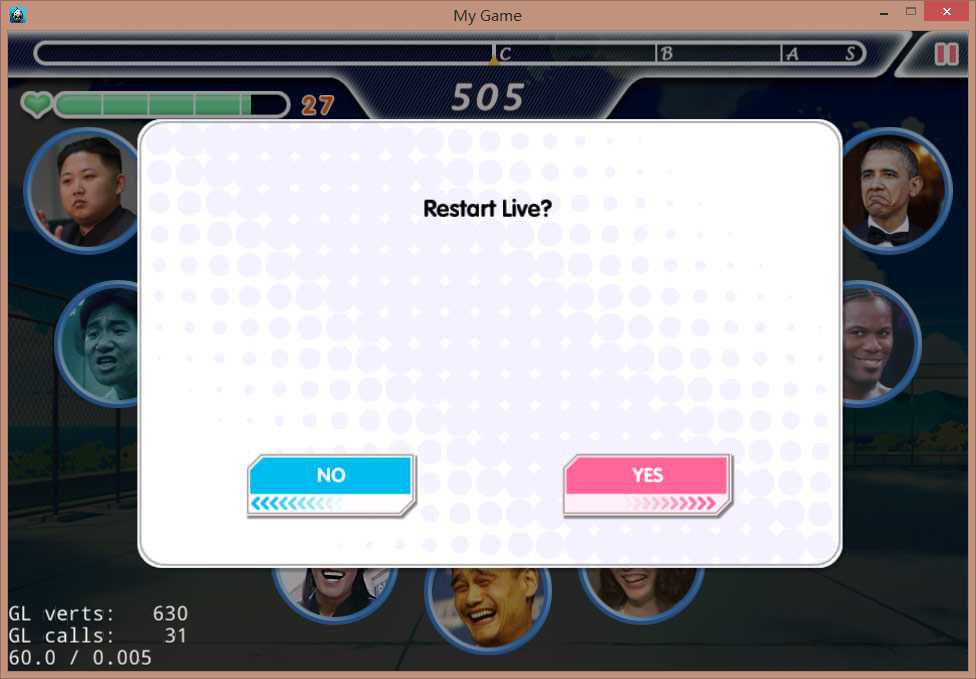
然后编译运行游戏。如果没有错的话,可以看到我们制作的UI已经被加上去了。并且玩的时候也是有特效的:
点击右上角的暂停按钮:
当体力为0后:
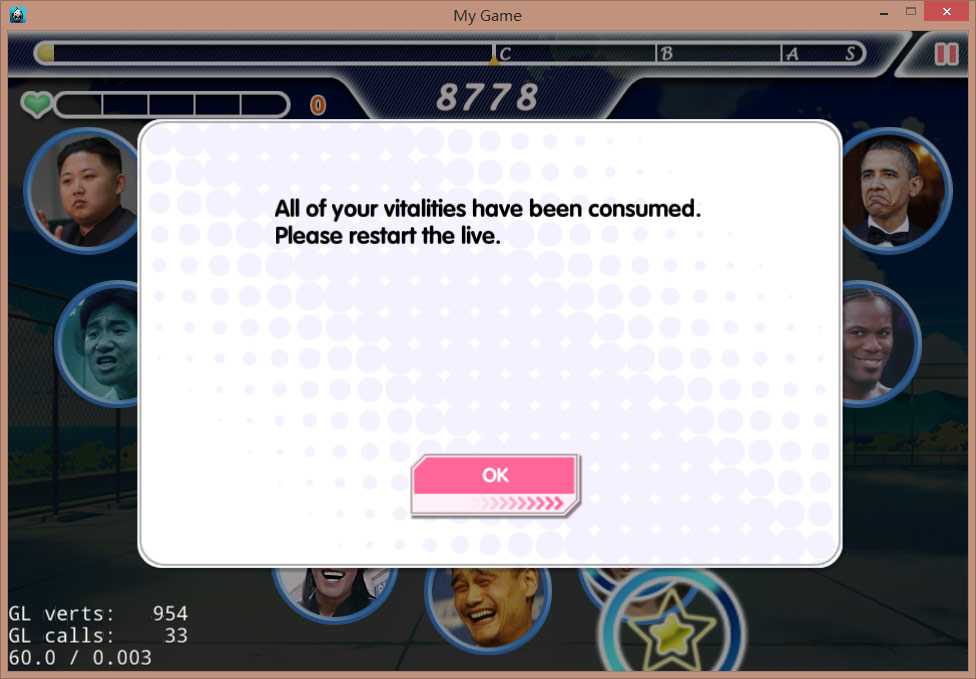
因为这个Demo只有Live场景,没有上级界面,所以对话框弹出后要么继续游戏要么重新开始。
【总结】
本章使用资源:下载地址(内有两个文件夹,Resources为资源,Projects为UI和动画工程(使用CocoStudio 1.6.0.0制作))
从一时兴起弄个项目玩玩到今天结稿,磕磕绊绊总算把坑填好了,自我感觉好像还算良好吧。感谢Cocos2d-x官网的宣传和支持,尤其感谢官网的某位编辑,如果不是她看中我的文章,这一系列也上不了官网。
博主毕竟too young,写的代码肯定有不少bug,望各位大神海涵。本项目及其包含的资源文件仅供大家学习交流,请勿用于商业用途。一旦因为不恰当的使用造成版权纠纷,怪我咯?
好了不废话了我得去收远征了(死

我用Cocos2d-x模拟《Love Live!学院偶像祭》的Live场景(五)
标签:
原文地址:http://www.cnblogs.com/GuyaWeiren/p/4575598.html