标签:
提示框的种类有很多,废话不多说,直接上代码
运行结果如下:
代码实现如下:
  1 @interface ViewController ()
  2 // 添加方法
  3 - (IBAction)add;
  4 // 移除方法
  5 - (IBAction)remove;
  6 // 商品容器
  7 @property (weak, nonatomic) IBOutlet UIView *shopsView;
  8
  9 @property (weak, nonatomic) IBOutlet UIButton *removeBtn;
 10 @property (weak, nonatomic) IBOutlet UIButton *addBtn;
 11 @property (weak, nonatomic) IBOutlet UILabel *hudLabel;
 12
 13 @property (nonatomic, strong)NSMutableArray *shops;
 14 @end
 15
 16 @implementation ViewController
 17
 18 // 控制器的view创建完毕就会调用
 19 // 该方法只会调用一次
 20 - (void)viewDidLoad
 21 {
 22     [super viewDidLoad];
 23
 24     // 一开始就让提示框隐藏
 25     self.hudLabel.alpha = 0.0;
 26 }
 27
 28 - (IBAction)add
 29 {
 30 /**********************计算X/Y**************************/
 31     // 商品的宽高
 32     CGFloat shopWidth = 70;
 33     CGFloat shopHeight = 100;
 34
 35     // 总行数和列数
 36     int totalCol = 3;
 37
 38     // 计算间隙
 39     CGFloat ColMargin = (self.shopsView.frame.size.width - (totalCol * shopWidth)) / (totalCol - 1);
 40     CGFloat RowMargin = ColMargin;
 41
 42
 43     // 获取绿色控件的子控件
 44     NSUInteger index = self.shopsView.subviews.count;
 45
 46     // 1.计算行号
 47     int row = index / 3;
 48     // 2.计算当前行的Y值
 49     // Y = 行号 * (商品的高度 + 间隙)
 50     CGFloat shopY = row * (shopHeight + RowMargin);
 51
 52     // 3.计算列号
 53     int col = index % 3;
 54     // 4.计算当前列的X值
 55     CGFloat shopX = col * (shopWidth + ColMargin);
 56
 57
 58 /**********************创建商品**************************/
 59
 60     // 1.加载XIB
 61     XMGShopView *shopView = [XMGShopView shopView];
 62
 63     // 2.设置frame
 64     CGRect tempFrame = shopView.frame;
 65     tempFrame.origin.x = shopX;
 66     tempFrame.origin.y = shopY;
 67     shopView.frame = tempFrame;
 68
 69     // 3.设置数据
 70     NJShop *shop = self.shops[index];
 71     shopView.shop = shop;
 72
 73     // 2.添加子控件
 74     [self.shopsView addSubview:shopView];
 75
 76 /**********************添加商品**************************/
 77
 78     // 6.控制删除按钮是否可以点击
 79     self.removeBtn.enabled = YES;
 80
 81     // 7.控制添加按钮是否可以点击
 82     self.addBtn.enabled = self.shopsView.subviews.count < self.shops.count;
 83
 84     // 8.控制提示框是否显示
 85     if (self.addBtn.enabled == NO) {
 86         [self showHUDWithText:@"商品柜已经满了, 不要再买买买了..."];
 87     }
 88 }
 89
 90 - (IBAction)remove
 91 {
 92
 93     NSLog(@"%@", self.shops[0]);
 94
 95     // 1.取出父控件中最后一个控件
 96     UIView *subView =  self.shopsView.subviews.lastObject;
 97     // 2.移除最后一个控件
 98     [subView removeFromSuperview];
 99
100     // 3.控制删除按钮是否可以点击
101     self.removeBtn.enabled = self.shopsView.subviews.count > 0;
102
103     // 4.控制添加按钮是否可以点击
104     self.addBtn.enabled = YES;
105
106     // 5.控制器提示框是否显示
107     if (self.removeBtn.enabled == NO) {
108
109         self.hudLabel.text = @"商品柜已经空了, 继续买买买...";
110         // 显示提示框
111         [UIView animateWithDuration:1.0 animations:^{
112             self.hudLabel.alpha = 1.0;
113         } completion:^(BOOL finished) {
114
115             [UIView animateWithDuration:1.0 delay:2.0 options:kNilOptions animations:^{
116                 self.hudLabel.alpha = 0.0;
117             } completion:nil];
118         }];
119
120         [self showHUDWithText:@"商品柜已经空了, 继续买买买..."];
121     }
122 }
123
124 - (void)showHUDWithText:(NSString *)text
125 {
126     // 1.设置需要展示的内容
127     self.hudLabel.text =text;
128
129     // 2.显示提示框
130     [UIView animateWithDuration:1.0 animations:^{
131         self.hudLabel.alpha = 1.0;
132     } completion:^(BOOL finished) {
133         // 3.隐藏提示框
134         [UIView animateWithDuration:1.0 delay:2.0 options:kNilOptions animations:^{
135             self.hudLabel.alpha = 0.0;
136         } completion:nil];
137     }];
138 }
139
140 // 重写getter方法
141 - (NSMutableArray *)shops
142 {
143     if (_shops == nil) {
144
145         // 1.获取plist文件的绝对路径
146         NSString *path = [[NSBundle mainBundle] pathForResource:@"shops.plist" ofType:nil];
147         // 2.根据路径加载plist文件
148         NSArray *tempArr = [NSArray arrayWithContentsOfFile:path];
149
150         // 3.将数组中所有的字典转换为模型
151         _shops = [NSMutableArray array];
152         for (NSDictionary *dict in tempArr) {
153             NJShop *shop = [[NJShop alloc] init];
154             shop.name = dict[@"name"];
155             shop.icon = dict[@"icon"];
156             [_shops addObject:shop];
157         }
158     }
159     return _shops;
160 }
161 @end
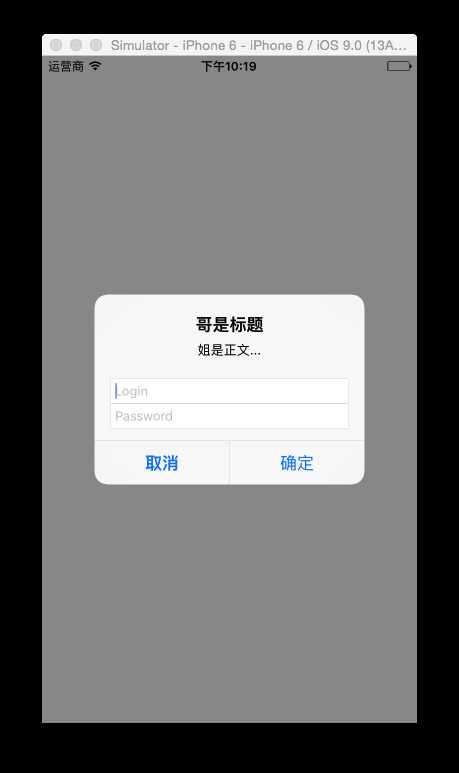
1.UIAlertView
代码如下:
- (void)useAlert
{
    // 1.UIAlerView
    // 如果看到iOS提供的方法中有... 就代表是一个可变参数,可以传一个或者多个

    UIAlertView *alert = [[UIAlertView alloc] initWithTitle:@"哥是标题" message:@"姐是正文..." delegate:self cancelButtonTitle:@"取消" otherButtonTitles:@"确定", nil];
    alert.alertViewStyle =  UIAlertViewStyleLoginAndPasswordInput;

    [alert show];
}
#pragma mark - UIAlertViewDelegate
// 只要UIAlertView上的按钮被点击, 就会调用
// alertView:谁触发事件就会把谁传递进来
// ButtonAtIndex: 当前被点击按钮的索引
- (void)alertView:(UIAlertView *)alertView clickedButtonAtIndex:(NSInteger)buttonInde
{
    // 取消 = 0, 确定 = 1 , 其他 = 2 , Other = 3 以此类推
    switch (buttonInde) {
        case 0:
            NSLog(@"点击了取消");
            break;
        case 1:
            NSLog(@"点击了确定");
            break;
        case 2:
            NSLog(@"点击了其他");
            break;
        case 3:
            NSLog(@"点击了Other");
            break;
        default:
            break;
    }
}
2. UIActionSheet
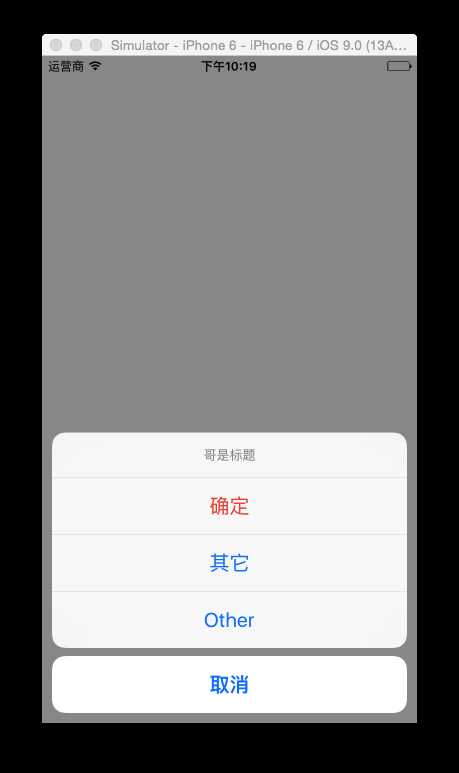
- (void)useActionSheet
{
    // 2.UIActionSheet
    // 1.创建UIActionSheet
    UIActionSheet *sheet = [[UIActionSheet alloc] initWithTitle:@"哥是标题" delegate:self cancelButtonTitle:@"取消" destructiveButtonTitle:@"确定" otherButtonTitles:@"其它", @"Other", nil];
    // 2.显示UIActionSheet
    [sheet showInView:self.view];
}

#pragma mark - UIActionSheetDelegate
// 只要UIActionSheet上的按钮被点击就会调用
// actionSheet:谁触发事件就会把谁传递进来
// clickedButtonAtIndex:当前被点击按钮的索引
- (void)actionSheet:(nonnull UIActionSheet *)actionSheet clickedButtonAtIndex:(NSInteger)buttonIndex
{
    NSLog(@"%ld", buttonIndex);
}
注意以上两中方法都要设置代理,那么分别要遵守
<UIAlertViewDelegate, UIActionSheetDelegate>协议
3. UIAlertController
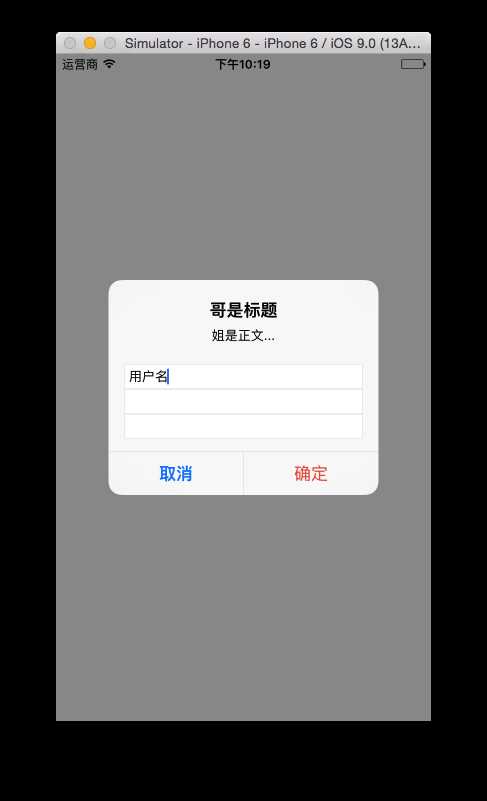
- (void)useAlertControllerAlert
{
    // 1.创建alert控制器
    UIAlertController *alertVc = [UIAlertController alertControllerWithTitle:@"哥是标题" message:@"姐是正文..." preferredStyle:UIAlertControllerStyleAlert];

    // 2.添加一个按钮
    // Title : 按钮上显示的文字
    // style: 按钮的样式
    // handler: 点击按钮之后的回调
    UIAlertAction *action1 = [UIAlertAction actionWithTitle:@"确定" style:UIAlertActionStyleDestructive handler:^(UIAlertAction * __nonnull action) {
        NSLog(@"点击了确定按钮");
    }];

    UIAlertAction *action2 = [UIAlertAction actionWithTitle:@"取消" style:UIAlertActionStyleCancel handler:^(UIAlertAction * __nonnull action) {
        NSLog(@"点击了取消按钮");
    }];

    [alertVc addAction:action1];
    [alertVc addAction:action2];

    // 3.添加三个输入框
    [alertVc addTextFieldWithConfigurationHandler:^(UITextField * __nonnull textField) {
        textField.text = @"用户名";
        NSLog(@"textField");
    }];
    [alertVc addTextFieldWithConfigurationHandler:^(UITextField * __nonnull textField) {
        textField.secureTextEntry = YES;
        NSLog(@"textField");
    }];
    [alertVc addTextFieldWithConfigurationHandler:^(UITextField * __nonnull textField) {
        NSLog(@"textField");
    }];

    // 4.presentViewController弹出一个控制器
    [self presentViewController:alertVc animated:YES completion:nil];

}
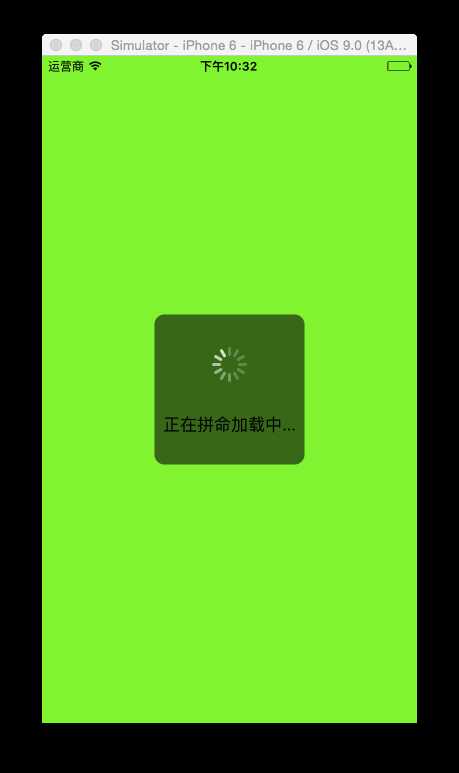
实现代码如下:
- (void)useCustomHUD
{
    // 1.创建父控件
    UIView *cover = [[UIView alloc] init];
    cover.backgroundColor = [UIColor colorWithRed:0 green:0 blue:0 alpha:0.5];
    cover.frame = CGRectMake(0, 0, 150, 150);
    cover.center = self.view.center;

    // 修改父控件为圆角
    cover.layer.cornerRadius = 10;
    [self.view addSubview:cover];

    // 2.创建菊花
    // 菊花有默认的尺寸
    // 注意: 虽然有默认的尺寸, 但是要想显示必须让菊花转起来
    UIActivityIndicatorView *activity = [[UIActivityIndicatorView alloc] initWithActivityIndicatorStyle:UIActivityIndicatorViewStyleWhiteLarge];
    activity.center = CGPointMake(cover.frame.size.width * 0.5, 50);
    [activity startAnimating];

    [cover addSubview:activity];
    // 3.创建UILabel
    UILabel *label = [[UILabel alloc] init];
    //    label.backgroundColor = [UIColor purpleColor];
    label.textAlignment = NSTextAlignmentCenter;
    label.text = @"正在拼命加载中...";
    label.frame = CGRectMake(0, cover.frame.size.height - 80, cover.frame.size.width, 80);
    [cover addSubview:label];

}
除了以上列出的几种方法外,还可以使用第三方框架,比如MBP
标签:
原文地址:http://www.cnblogs.com/chglog/p/4655853.html