标签:
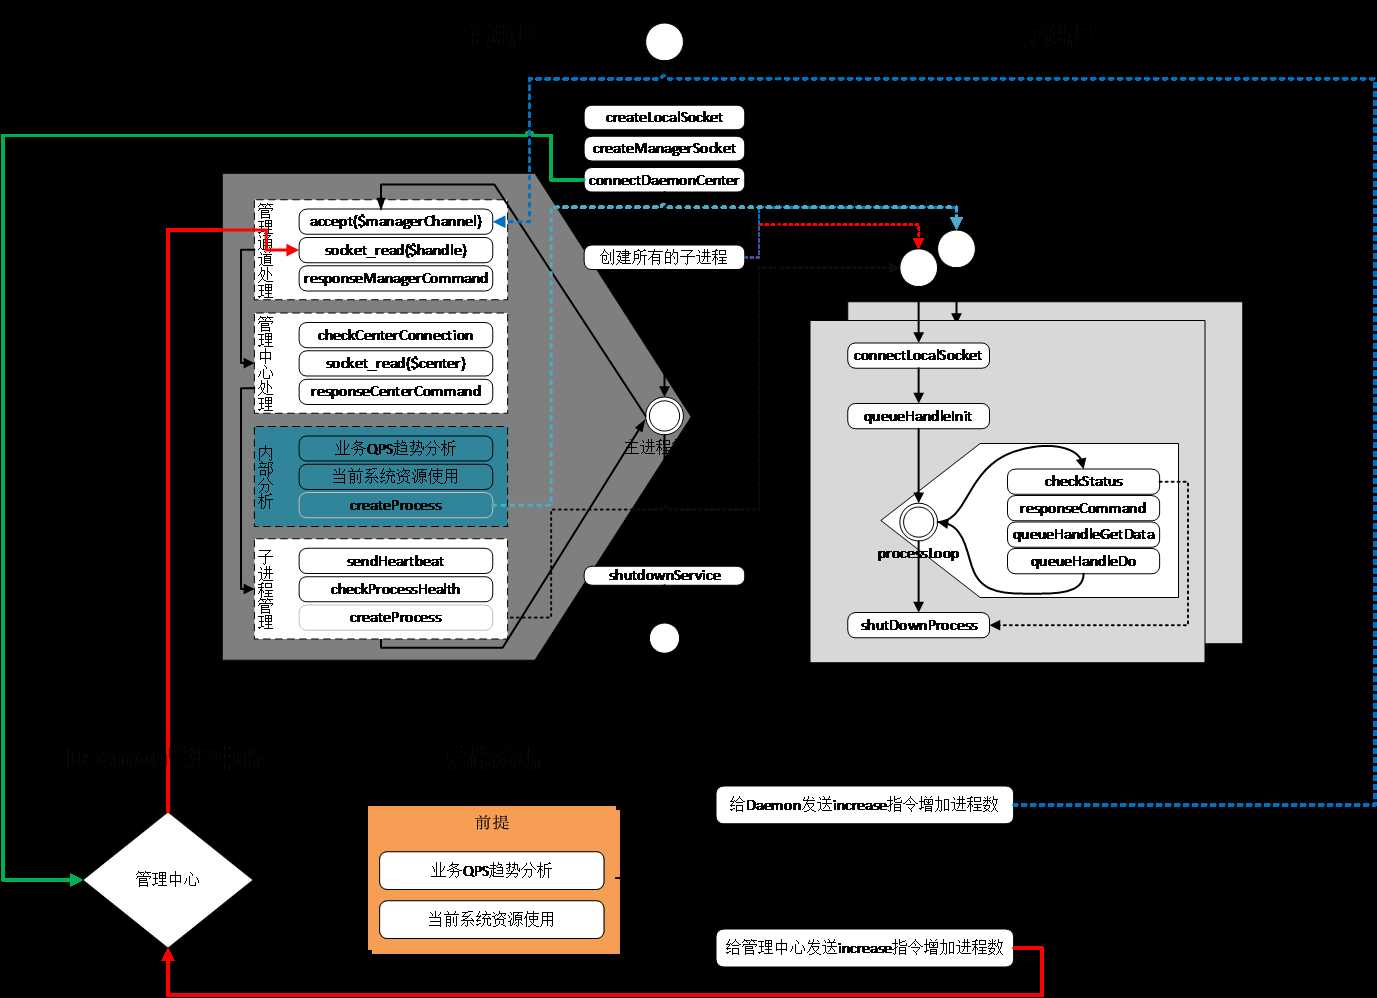
这个框架主要是开多个子进程来异步处理任务,同时主进程能和子进程通信,了解子进程的status,并且能restart子进程。
管理者可以了解主进程的信息info,并且能shutdown主进程。管理者和主进程之间通过tcp通信。
这个过程涉及主进程Master,子进程Worker,队列Queue,以及消费者Consumer。
这几天学习框架,一方面要学会如何组装零件,也要回拆解零件,更加要学会改进零件。
问问自己
(1) 框架的数据流是否梳理清楚
(2) 能否改进框架
(3) 如果框架有bug,能否将其修复
(4) 这个框架有什么优缺点,为什么要如此设计
(5) 如果重写这个框架,你是否能重写好这个框架。
有些事情,出现得刚刚好。
刚好最近在研究框架之类的东西,先看了一个MVC框架类的简单东西。很久没有刷微博,偶尔刷微博的时候,突然发现了一个项目框架作者分享的daemon处理框架,跟项目的框架非常类似,但是更加简洁。

于是屁颠屁颠将代码git clone下来,并且在机器上部署了ubantu的虚拟机。
--运行daemon程序
--从queue中pop出data,然后输出这个data
---使用phpredis的扩展
---在Redis中写队列的相关扩展
---使用mysqlDB,能够访问db的资源
---为一个工程配置各种资源
---想想如何将工程逻辑单独提取出来,再单独建立一个App的文件夹,然后在App中写好run的相关逻辑,在配置指定好run函数所在脚本。
---主进程和子进程如何通信的,子进程如何循环重启的?---代码中有自动重启的部分,如果运行超过一定时间,子进程会给主进程发送restart的命令,主进程会将子进程的worker从workerclients中去除。主进程在轮询的时候,遍历workerclients,发现worker不存在了,会重新再创建。
---管理进程与主进程保持通信,直接redis-cli –h 127.0.0.1 –p 9008就可以看主进程的运行状态。
1. 感性认识
配置运行环境
安装xmapp
安装redis
配置phpredis
运行代码
https://github.com/pythias/Stark
php src/Stark/run.php -f [ini_config_file]
第一步自己写了一个测试,将数据打印出来,之后逐步修改代码,queue->pop出数据,consumer->run处理数据。
在run.php中get_options返回queue的相关参数,这样可以创建队列实例,并且实现pop函数。这样可以通过queue->pop()从队列中获取到相关数据,并且采用实例化的consumer对象调用run函数来处理data。
<?php
...
function get_options($file) {
    ....
            ‘queue‘ => array(
            ‘class‘ => ‘\\Stark\\Daemon\\Queue\\RedisQueue‘,
            ‘options‘ => array(
                ‘host‘ => get_option_value($config, ‘queue.host‘, ‘127.0.0.1‘),
                ‘port‘ => get_option_value($config, ‘queue.port‘, 6379),
                ‘queueKey‘ => get_option_value($config, ‘queue.queueKey‘, ""),

            ),
        ),

    ....
}
RedisQueue其实是使用redis来作为队列,进行数据的pop。
<?php
namespace Stark\Daemon\Queue;

class RedisQueue extends Base {
    protected $_serverConfigs = false;
    protected $_queueKey = false;
    protected $_host = false;
    protected $_port = false;
    private $_redis = null;

    public function init(\Stark\Daemon\Worker $worker) {
        //连接服务器
        $this->_redis = new \Redis();
        $this->_redis->connect($this->_host, $this->_port);
        $this->_redis->rpush($this->_queueKey, "you are a beautiful girl!");
    }

    public function pop(\Stark\Daemon\Worker $worker) {
          $data = $this->_redis->lpop($this->_queueKey);
          return $data;
    }

    public function push(\Stark\Daemon\Worker $worker, $data) {

          echo "push data - {$this->_queueKey} - {$data}\r\n";
          return $this->_redis->rpush($this->_queueKey, $data);
    }


    public function complete(\Stark\Daemon\Worker $worker) {
        //关闭链接
        $this->_redis->close();
    }

}
2. 入口文件run.php
$options = get_options($config_file);
$daemon = new \Stark\Daemon\Master($options);
$daemon->start();
(1)getOptions解析配置文件,获取Consumer,Queue,Master的参数。
配置文件config.ini如下
[main]
name = "config"
host = "127.0.0.1"
port = 9008
working_dir = "/tmp"

[run]
script_file = "run.php"
memory_limit = "1024M"

[worker]
count = 4
max_run_count = 10000
max_run_seconds = 3600
max_idle_seconds = 60

[queue]
host = "127.0.0.1"
port = "6380"
queueKey = "test:redis"
解析出来的参数如下:
Options = array(
        ‘consumer‘ => array(
            ‘class‘ => ‘\\Stark\\Daemon\\Consumer\\Callback‘,
            ‘options‘ => array(
                ‘init‘ => ‘init‘,
                ‘run‘ => ‘run‘,
                ‘complete‘ => ‘complete‘,
            ),
        ),

        ‘queue‘ => array(
            ‘class‘ => ‘\\Stark\\Daemon\\Queue\\RedisQueue‘,
            ‘options‘ => array(
                ‘host‘ => get_option_value($config, ‘queue.host‘, ‘127.0.0.1‘),
                ‘port‘ => get_option_value($config, ‘queue.port‘, 6379),
                ‘queueKey‘ => get_option_value($config, ‘queue.queueKey‘, ""),

            ),
        ),
        ‘master‘ => array(
            ‘name‘ => get_option_value($config, ‘main.name‘, ‘Stark_‘ . time()),
            ‘host‘ => get_option_value($config, ‘main.host‘, ‘127.0.0.1‘),
            ‘port‘ => get_option_value($config, ‘main.port‘, 9003),
            ‘maxWorkerCount‘ => get_option_value($config, ‘worker.count‘, 1),
            ‘maxRunCount‘ => get_option_value($config, ‘worker.max_run_count‘, 10000),
            ‘maxRunSeconds‘ => get_option_value($config, ‘worker.max_run_seconds‘, 3600),
            ‘maxIdleSeconds‘ => get_option_value($config, ‘worker.max_idle_seconds‘, 60),
            ‘memoryLimit‘ => get_option_value($config, ‘run.memory_limit‘, ‘1024M‘),
        ),
);
(2)创建Master实例,并根据返回options创建consumer,worker,queue实例,并且初始化master的相应选项。
Master继承Options类,所以创建Master实例的时候,会执行Options的构造函数。
<?php
namespace Stark\Core;

class Options {
    public function __construct($options = array()) {
        $this->setOptions($options);
    }

    protected function setOptions($options) {
        if (is_array($options) == false && empty($options)) {
            return;
        }

        foreach ($options as $key => $value) {
            $methodName = ‘_set‘ . ucfirst($key) . ‘Options‘;
            if (method_exists($this, $methodName)) {
                if (call_user_func_array(array($this, $methodName), array($value)) == false) {
                    throw new \Stark\Daemon\Exception\Options("Set option failed, option:{$key}");
                } else {
                    continue;
                }
            }

            $property = "_{$key}";
            if (isset($this->$property) == false) throw new \Stark\Daemon\Exception\Options("Set option failed, option:{$key}");
            $this->$property = $value; //TODO:value type
        }

        return true;
    }
}

?>
Options相当于一个基类。可以用来创建类实例,同时初始化实例成员。依据上面options数组的KEY(master,consumer,queue等),如果存在_set[KEY]Options 这个函数,就执行该函数,如果成员变量存在相应的key,就初始化该成员。
 protected function _setMasterOptions($options) {
        return $this->setOptions($options);
    }

    protected function _setQueueOptions($options) {
        return $this->_setClassOptionsByType($options, ‘Queue‘);
    }

    protected function _setConsumerOptions($options) {
        return $this->_setClassOptionsByType($options, ‘Consumer‘);
    }

    private function _setClassOptionsByType($options, $type) {
        if (empty($options[‘class‘])) {
            return false;
        }

        $className = $options[‘class‘];
        if ($className[0] != ‘\\‘) {
            $className = "\\Stark\\Daemon\\{$type}\\{$className}";
        }

        if (class_exists($className) == false) {
            return false;
        }

        $property = ‘_‘ . lcfirst($type);
        $this->$property = new $className(isset($options[‘options‘]) ? $options[‘options‘] : array());

        return true;
    }
上述的代码的功能主要是创建Master的_consumer(Consumer类型),_queue(Queue类型)实例,然后初始化Master的name,host,port以及maxWorkerCount,maxRunCount,maxRunSeconds,maxIdelSeconds,memoryLimit成员变量。
(3)启动主进程
主进程启动函数,主要负责检查运行环境(php版本)是否满足要求checkEnvironments;并初始化工程目录initialize;判断daemon程序是否一直在运行(若在运行,则终止);在后台运行主进程runInBackground,并且设置其跑满所有的核setAffinity;然后是创建主进程和子进程的本地通信socket连接(createDaemonSocket),管理进程和主进程的网络通信socket连接(createAdminSocket)。之后创建多个workers,并且启动多个worker。
startLoop轮询去检查多个worker的状态,接受管理进程的请求(info,shutdown),接受子进程的请求(restart,status)。
以下是Master::start的函数:
    public function start() {
        ini_set(‘memory_limit‘, $this->_memoryLimit);
        $this->_checkEnviroments();
        $this->_initialize();

        $this->_daemonIsRunning();

        \Stark\Core\System::runInBackground();
        $this->_pid = posix_getpid();
        $this->_createPidFile();
        \Stark\Core\System::setAffinity($this->_pid);
        \Stark\Core\System::setProcTitle($this->_pid, "daemon ‘{$this->_name}‘");

        //sample worker
        $this->_createSampleWorker();

        //start daemon
        $this->_startTime = microtime(true);
        $this->_setupSignal();
        $this->_createDaemonSocket();
        $this->_createAdminSocket();
        $this->_startWorkers();
        $this->_startLoop();
    }
创建多个wokers子进程,并且启动各个子进程,各个子进程进行相应的初始化,各项轮询,最后进行关闭整个daemon。至于子进程是如何启动的,后续再进行讲述。
private function _createWorker($index) {
        echo "Start worker {$index}\r\n";
        $currentMicroTime = microtime(true);

        if (isset($this->workerStatuses[$index]) == false) {
            $this->workerStatuses[$index] = new \Stark\Daemon\Status();
        }

        if (($currentMicroTime - $this->workerStatuses[$index]->startTime) < self::WORKER_START_INTERVAL_SECONDES) {
            $this->_log->log("Worker {$index} cannt start right now", \Stark\Core\Log\Level::ERROR);
            return false;
        }

        $this->workerStatuses[$index]->startTime = $currentMicroTime;
        $this->workerStatuses[$index]->lastActiveTime = $currentMicroTime;

        $forkPid = pcntl_fork();

        if ($forkPid == -1) {
            $this->_exit("Unable to fork worker {$index}");
        }

        if ($forkPid) {
            $this->workerStatuses[$index]->pid = $forkPid;
        } else {
            socket_close($this->_daemonSocket);
            socket_close($this->_adminSocket);

            $pid = posix_getpid();
            \Stark\Core\System::setAffinity($pid, ‘2-32‘);
            \Stark\Core\System::setProcTitle($pid, "daemon ‘{$this->_name}‘ worker {$index}");

            $this->workerStatuses[$index]->totalCpuU += $this->workerStatuses[$index]->cpuU;
            $this->workerStatuses[$index]->totalCpuS += $this->workerStatuses[$index]->cpuS;

            $this->_worker->pid = $pid;
            $this->_worker->index = $index;
            $this->_worker->start();
        }
    }
Master是主进程,Worker是子进程,Master和Worker之间是主进程和子进程间的本地通信,而Admin和Master之间是两台机器之间的网络TCP通信。
这个是管理进程和主进程进行通信。
 private function _startLoop() {
        $this->_log->log("Starting daemon: {$this->_name}", \Stark\Core\Log\Level::INFO);

        $time = microtime(true);
        $lastWorkerTime = $time;
        $lastAdminTime = $time;

        while (true) {
            $now = microtime(true);

            if (($now - $lastAdminTime) > self::ADMIN_DATA_INTERVAL_SECONDES) {
                $this->_acceptConnection($this->_adminSocket, $this->_adminClients);
                $this->_checkAdminCommands();

                $lastAdminTime = $now;
            }

            $this->_acceptConnection($this->_daemonSocket, $this->_workerClients);

            if (($now - $lastWorkerTime) > $this->_heartbeat) {
                $this->_sendHeartbeatToWorkers();

                $missingWorkerList = $this->_checkWorkerStatus();

                if (empty($missingWorkerList) === false) {
                    foreach ($missingWorkerList as $index) {
                        $this->_createWorker($index);
                    }
                }

                $lastWorkerTime = $now;
            }

            usleep(1000);
        }
    }
主进程和子进程如何通信的,子进程如何循环重启的?
    private function _acceptConnection($socket, &$clients) {
        $newClient = @socket_accept($socket);

        if ($newClient) {
            socket_set_nonblock($newClient);
            socket_getsockname($newClient, $ip, $port);
            $clients[] = array(
                ‘client‘ => $newClient,
                ‘ip‘ => $ip,
                ‘port‘ => $port,
                ‘index‘ => -1,
            );
        }
    }
    private function _checkAdminCommands() {
        $offlineClients = array();

        foreach ($this->_adminClients as $key => $clientInfo) {
            $client = $clientInfo[‘client‘];
            $responseValue = Protocol::read($client); // 从客户端client读取到命令

            if (empty($responseValue)) {
                if (is_resource($client)) {
                    $errorCode = socket_last_error($client);

                    if ($errorCode != SOCKET_EAGAIN) {
                        $offlineClients[] = $key;
                    }
                } else {
                    $offlineClients[] = $key;
                }
            } else {
                $this->_responseCommand($client, $responseValue, self::COMMAND_FROM_ADMIN); // 解析管理进程发出的命令
            }
        }

        foreach ($offlineClients as $key) {
            if (is_resource($this->_adminClients[$key])) {
                socket_close($this->_adminClients[$key]);
            }

            unset($this->_adminClients[$key]);
        }

        return true;
    }
info命令,应该是主进程从管理进程所在客户端读取,然后解析info命令,第一个参数为command,后续参数为命令参数,,调用infoAdminHandler进行相应处理。
shutdown命令类似。
// 给子进程发送心跳,检查其状态,如果无法获取到子进程的状态,说明该子进程已经死掉,所以要从workerClients列表中清除它。
private function _sendHeartbeatToWorkers() {
        foreach ($this->_workerClients as $key => $clientInfo) {
            $client = $clientInfo[‘client‘];

            if ($this->_sendCommandToWorker($client, ‘status‘) === false) {
                unset($this->_workerClients[$key]);
                continue;
            }
        }
    }

  private function _sendCommandToWorker($client, $command, $arguments = array()) {
        $write = Protocol::write($client, $command, $arguments); // 往子进程写命令请求

        if ($write === false) return false;

        $responseValue = Protocol::read($client, false); // 读取子进程返回的结果
        if (empty($responseValue) === false) {
            $this->_responseCommand($client, $responseValue, self::COMMAND_FROM_WORKER); // 解析子进程的返回的结果
        }

        return true;
    }
主进程往子进程写status命令请求,子进程读取status命令,并将处理结果返回给主进程,即主进程从子进程客户端读取status命令的处理结果。
status是子进程处理命令请求,返回结果。但是这个status命令请求是主进程发出来的。
后续的restart命令是子进程传给主进程,主进程处理restart命令请求,将该子进程杀掉,之后在检查该子进程不存在的时候,重新创建。
(4)启动子进程,并且轮询消耗队列,进行相关处理,同时
    public function start() {
        $this->_initialize();
        $this->_startLoop();
        $this->_finalize();

        exit;
    }
Worker的循环,不断的消耗队列。DoQueue由消费者去消耗queue->pop出的data。ReceiveCommands连接主进程,接收主进程的命令,并返回相应的结果。
private function _startLoop() {
        while ($this->_run) {
            $this->_queueStartTime = microtime(true);

            $this->_checkStatus();     // 检查相关的状态
            $this->_receiveCommands(); // 接收主进程的相关命令(比如status命令)

            if ($this->_pause) {
                usleep(1000);
                continue;
            }

            if ($this->_doQueue() === false) {
                usleep(1000);
            }
        }
    }
该框架的难点在于:进程间通信(包括主进程和子进程之间的通信,也包括管理进程和主进程之间的TCP通信)
打日志----标记时间,文件名,类名,函数名,功能,来处理相关函数。
还非常需要流程图!!!!

标签:
原文地址:http://www.cnblogs.com/TsingLo/p/4678565.html