标签:
处理has-one关系需要用到association元素,而处理has many关系则需要用到collection元素。例如本例中,假设一 名教师可同时指导多名学生,下面就来介绍如何使用collection元素来实现这种映射,具体的任务是查询出教师及其指导的多个学生的信息(本示例源代 码下载页面:http://down.51cto.com/data/490947)。
一、为Teacher实体增加相关属性
为教师实体增加指导学生集合的属性如下:
private List<Student> supStudents;//指导学生
并为其增加setter和getter方法,这里略过。
二、TeacherMapper接口
为实现教师实体映射,应先创建映射器接口如下:
package com.abc.mapper;
import com.abc.domain.Teacher;
public interface TeacherMapper {
   public Teacher getById(int id);
}
三、映射文件
为教师实体创建的映射文件如下:
<?xml version="1.0" encoding="utf8"?>
<!DOCTYPE mapper PUBLIC "-//mybatis.org//DTD Mapper 3.0//EN" "http://mybatis.org/dtd/mybatis-3-mapper.dtd">
<!--与以前一样,namespace的值是对应的映射器接口的完整名称-->
<mapper namespace="com.abc.mapper.TeacherMapper">
<!--TeacherMapper接口中getById方法对应的SQL语句。
查询教师及其指导的学生的信息。由于教师、学生都有
id、name、gender等属性,因此给教师的字段都起了别名-->
<select id="getById" parameterType="int" resultMap="supervisorResultMap">
select t.id t_id, t.name t_name, t.gender t_gender,
t.research_area t_research_area, t.title t_title,
s.id,s.name, s.gender,s.major,s.grade
from teacher t,student s where t.id=#{id}
and s.supervisor_id = t.id
</select>
<!--教师实体映射-->
<resultMap id="supervisorResultMap" type="Teacher">
<id property="id" column="t_id"/>
<result property="name" column="t_name"/>
<result property="gender" column="t_gender"/>
<result property="researchArea" column="t_research_area"/>
<result property="title" column="t_title"/>
<!--collection元素映射教师的指导学生集合的属性。resultMap
以命名空间名.resultMap的id的形式,引用studentResultMap。
需要注意的是,上面的select语句中学生的字段名/别名应与
studentResultMap中的column属性一致-->
<collection property="supStudents"
resultMap="com.abc.mapper.StudentMapper.studentResultMap"/>
</resultMap>
</mapper>
相应地,学生实体的映射文件如下:
<?xml version="1.0" encoding="utf8"?>
<!DOCTYPE mapper PUBLIC "-//mybatis.org//DTD Mapper 3.0//EN" "http://mybatis.org/dtd/mybatis-3-mapper.dtd">
<mapper namespace="com.abc.mapper.StudentMapper">
<resultMap id="studentResultMap" type="Student">
<id property="id" column="id"/>
<result property="name"   column="name"/>
<result property="gender" column="gender"/>
<result property="major"  column="major"/>
<result property="grade"  column="grade"/>
<!--相应地,在此引用supervisorResultMap,亦采用
命名空间名.resultMap的id的形式。-->
<association property="supervisor"
resultMap="com.abc.mapper.TeacherMapper.supervisorResultMap"/>
</resultMap>
</mapper>
在工程的src\resources目录下新建子目录mappers,用来统一存放映射文件。为了能让MyBatis找到这些映射文件,修改其核心配置文件configuration.xml中的mappers元素如下:
<!--在classpath中以相对路径的形式引用映射文件-->
<mappers>
<mapper resource="resources/mappers/StudentMapper.xml"/>
<mapper resource="resources/mappers/TeacherMapper.xml"/>
</mappers>
注意:resources目录在工程编译前会被复制到classes目录下(详见工程生成文件build.xml中的copy-resources和compile这两个target),而classes目录会被ant添加到classpath中。
四、执行类
执行类为CollectionDemo,其内容如下:
package com.demo;
import org.springframework.context.ApplicationContext;
import com.abc.mapper.StudentMapper;
import com.abc.mapper.TeacherMapper;
import com.abc.domain.Teacher;
import com.abc.domain.Student;
import org.springframework.context.support.ClassPathXmlApplicationContext;
import java.util.List;
public class CollectionDemo
{
private static ApplicationContext ctx;
static
{
//在类路径下寻找resources/beans.xml文件
ctx = new ClassPathXmlApplicationContext("resources/beans.xml");
}
public static void main(String[] args)
{
//从Spring容器中请求映射器
TeacherMapper mapper =
(TeacherMapper)ctx.getBean("teacherMapper");
//查询id为1的教师
Teacher teacher = mapper.getById(1);
if(teacher == null)
{
System.out.println("未找到相关教师信息。");
}
else
{
//教师信息
System.out.println("**********************************************");
System.out.println("教师姓名:" + "  " + teacher.getName());
System.out.println("教师职称:" + "  " + teacher.getTitle());
System.out.println("**********************************************");
System.out.println("指导学生信息:");
//遍历指导的学生
for(Student s : teacher.getSupStudents())
{
System.out.println("**********************************************");
System.out.println( s.getName() + "  " + s.getGender() + "  " + s.getGrade()
+ "  " + s.getMajor());
//从学生端访问教师
System.out.println("指导教师研究方向:" + s.getSupervisor().getResearchArea());
}
System.out.println("**********************************************");
}
}
}
从中可看出,可以从任意一端访问另一端的对象。
五、修改build.xml
为了能用ant运行此程序,需修改build.xml中的run target,指定类CollectionDemo为执行类。如下:
<target name="run" depends="compile">
<!--指定CollectionDemo为要运行的类-->
<java fork="true" classname="com.demo.CollectionDemo"
classpathref="library">
<!--把classes目录添加到工程的classpath中。
${targetdir}是指引用上面定义的property元素targetdir-->
<classpath path="${targetdir}"/>
</java>
</target>
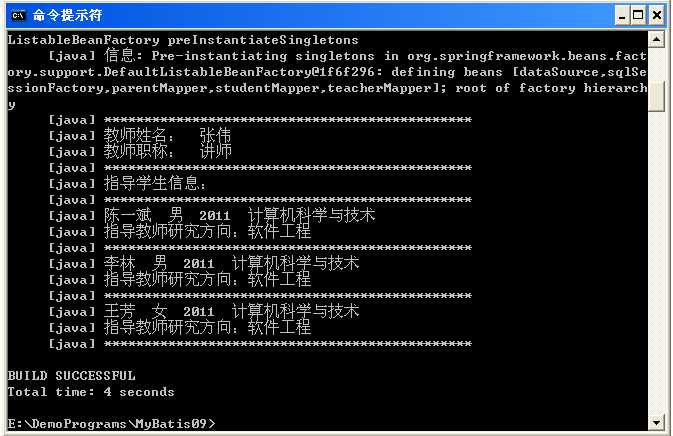
运行结果如下:

标签:
原文地址:http://www.cnblogs.com/duanxz/p/3830532.html