标签:
1、CALayer
1)、在ios中,能看得见摸得着的东西基本上都是UIView, 比如按钮、文本标签、文本输入框、图标等,这些都是UIView
2)、UIView之所以能显示在屏幕上,完全是因为它内部的一个图层
3)、在创建UIView对象时,UIView内部会自动创建一个图层(即CALayer对象),通过UIView的layer属性可以访问这个层:@property (nonatomic,readonly,retain) CALayer *layer;
4)、当UIView需要显示到屏幕上时,会调用drawRect:方法进行绘图,并且会将所有内容绘制在自己的图层上,绘图完毕后,系统会将图层拷贝到屏幕上,于是就完成了UIView的显示。UIView本身不具备显示的功能,是它内部的层才有显示功能
5)、通过CALayer对象,可以很方便的调整UIView的一些外观属性,比如:阴影、圆角大小、边框宽度和颜色。。。,还可以给图层添加动画,来实现一些比较炫酷的效果
6)、CALayer属性:
@property CGRect bounds; //宽度和高度
@property CGPoint position; //位置(默认指中点,具体由anchorPoint决定)
@property CGPoint anchorPoint; //锚点(x、y的范围都是0->1),决定了position的含义
@property CGColorRef backgroundColor; //背景颜色(CGColorRef类型)
@property CATransform3D transform; //形变属性
@property CGColorRef borderColor; //边框颜色(CGColorRef类型)
@property CGFloat borderWidth; //边框宽度
@property CGFloat conerRadius; //圆角半径
@property id contents; //内容(比如设置图片CGImageRef)
@property CGColorRef shadowColor; //阴影颜色
@property float shadowOpacity; //阴影不透明(取值范围0.0 -> 1.0)
@property CGSize shadowOffset; //阴影偏移位置
7)、CALayer是定义在QuartzCore框架中的[Core Animation];
CGImageRef、CGColorRef两种数据类型是定义在CoreGraphics框架中;
UIColor、UIImage是定义在UIKit框架中的;
QuartzCore框架和CoreGraphics框架是可以跨平台使用的,在ios和Mac OSX上能使用;
但是UIKit只能在ios中使用;为了保证可移植性,QuartzCore不能使用UIImage、UIColor,只能使用CGImageRef、CGColorRef
8)、UIView和CALayer的比较
通过CALayer,可以做出跟UIView一样的界面效果;但是UIView多了一个事件处理的功能,CALayer不能处理用户的触摸事件;
不过CALayer的性能会高一些,因为它少了事件处理的功能,更加轻量级
9)、每个UIView内部都默认关联着一个CALayer, 我们可以称这个CALayer为RootLayer(跟层);
所有的非RootLayer, 也就是手动创建的CALayer对象,都存在着隐式动画;
隐式动画是指当对非RootLayer的部分属性进行修改时,默认会自动产生一些动画效果;这些属性称为Animatable Properties(可动画属性)
几个常见的Animatable Properties: bounds、backgroundColor、position
可以通过动画事务(CATransaction)关闭默认的隐式动画效果:

1 [CATransaction  begin];
2 [CATransaction setDisableActions: YES];
3 self.myView.layer.position = CGPointMake(10, 10);
4 [CATransaction commit];
2、Core Animation
1)、Core Animation是一组非常强大的动画处理API, 使用它能做出非常绚丽的动画效果,少量的代码可以实现非常强大的功能
2)、Core Animation的动画执行过程都是在后台操作的,不会阻塞主线程
3)、Core Animation是直接操作在CALayer上的,并非UIView
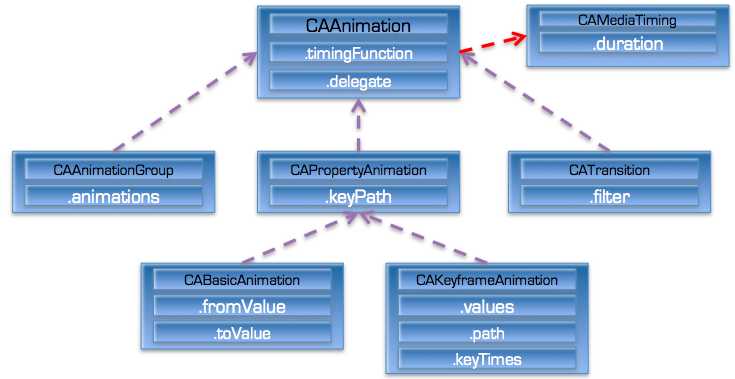
4)、CAAnimation继承结构,紫色虚线表示继承自某类,红色虚线表示遵守某个协议
:
5)、CAAnimation
是所有动画对象的父类,负责控制动画的持续时间和速度,是个抽象类,不能直接使用,只能使用它具体的子类。
属性说明:
duration: 动画的持续时间
repeatCount: 重复次数,无限循环可以设置HUGE_VALF或MAXFLOAT
repeatDuration: 重复时间
removeOnCompletion : 默认为YES, 代表动画执行完毕后就从图层上移除,图形会恢复到动画执行前的状态。如果想让图层保持显示动画执行后的状态,那就设置为NO,
不过还要设置fillMode为kCAFillModeForwards
fillMode : 决定当前对象在非activate时间段的行为。比如动画开始之前或者动画结束之后
beginTime : 可以用来设置动画延迟执行时间,若想延迟2s,就设置为CACurrentMediaTime()+2, CACurrentMediaTime()为图层的当前时间
timingFunction: 速度控制函数,控制动画运行的节奏
delegate : 动画代理
6)、fillMode属性值(要想fillMode有效,最好设置removedOnCompletion = NO)
kCAFillModeRemoved : 这个是默认值,也就是说当动画开始前和动画结束后,动画对layer都没有影响;动画结束后,layer会恢复到之前的状态
kCAFillModeForwards : 当动画结束后,layer会一直保持这动画最后的状态
kCAFillModeBackwards : 在动画开始前,只需要将动画加入了一个layer, layer便立刻进入动画的初始状态并等待动画开始
kCAFillModeBoth : 是kCAFillModeForwards和kCAFillModeBackwards的合成,动画加入后开始之前,layer便处于动画出事状态,动画结束后layer保持动画最后的状态
7)速度控制函数(CAMediaTimingFunction)
kCAMediaTimingFunctionLinear (线性):匀速,给你一个相对静态的感觉
kCAMediaTimingFunctionEaseIn (渐进): 动画缓慢进入,然后加速离开
kCAMediaTimingFunctionEaseOut (渐出): 动画全速进入,然后减速的到达目的地
kCAMediaTimingFunctionEaseInEaseOut (渐进渐出): 动画缓慢的进入,中间加速,然后减速的到达目的地。这个是默认的动画行为
8)CAAnimationDelegate 动画代理方法
/* Called when the animation begins its active duration */
- (void)animationDidStart: (CAAnimation *)anim;
/* Called when the animation either completes its active duration or is removed from the object it is attached to (i.e. the layer). ‘flag‘
is true is the animation reached the end of its activate duration without beging removed. */
- (void)animationDidStop:(CAAnimation *)anim finished:(BOOL)flag;
9)、CAPropertyAnimation
CAPropertyAnimation是CAAnimation的子类,也是个抽象类,要想创建动画对象,应该使用它的两个子类:
CABasicAnimation 和 CAKeyframeAnimation
属性说明:
keyPath: 通过指定CALayer的一个属性名称为keyPath(NSString类型),并且对CALayer的这个属性的值进行修改,达到相应的动画效果。
比如指定@"position"为keyPath, 就修改CALayer的position属性的值,已达到平移的动画效果
10)、CABasicAnimation -- 基本动画
属性说明:
fromValue : keyPath相应属性的初始值
toValue: keyPath相应属性的结束值
动画过程说明: 随着动画的进行,在长度为duration的持续时间内,keyPath相应属性的值从fromValue渐渐的变为toValue;
如果fillMode = kCAFillModeForwards 同时removedOnCompletion = NO, 那么在动画执行完毕后,图层会保持显示动画执行后的状态。但是实质上,
图层的属性值还是动画执行前的初始值,并没有真正的被改变
11)、CAKeyframeAnimation --- 关键帧动画
关键帧动画,也是CAPropertyAnimation的子类,与CABasicAnimation的区别是:
CABasicAnimation只能从一个数值(fromValue) 变到另一个数值(toValue), 而CAKeyframeAnimation会使用一个NSArray保存这些数值
属性说明:
values: NSArray对象。里面的元素称为“关键帧”【keyframe】。动画对象会在指定的时间(duration)内,依次显示values数组中的每一个关键帧
path: 可以设置一个CGPathRef、CGMutablePathRef, 让图层按照路径轨迹移动。path只对CALayer的anthorPoint和position起作用。如果设置了path,那么values将被忽略
keyTimes: 可以为对应的关键帧指定对应的时间点,其取值范围为0到1.0, keyTimes中的每个时间值都对应values中的每一帧。如果没有设置keyTimes,各个关键帧的时间是平分的
12)、CAAnimationGroup --- 动画组
动画组,是CAAnimation的子类,可以保存一组动画对象,将CAAnimationGroup对象加入层后,组中所有动画对象可以同时并发运行
属性说明:
animations: 用来保存一组动画对象的NSArray。默认情况下,一组动画对象是同时运行的,也可以通过设置动画对象的beginTime属性来更改动画的开始时间
13)、转场动画 --- CATransition
CATransition是CAAnimation的子类,用于做转场动画,能够为层提供移除屏幕和移入屏幕的动画效果。ios比Mac OSX的转场动画效果少一点
UINavigationController就是通过CATransation实现了将控制器的视图推入屏幕的动画效果
动画属性:
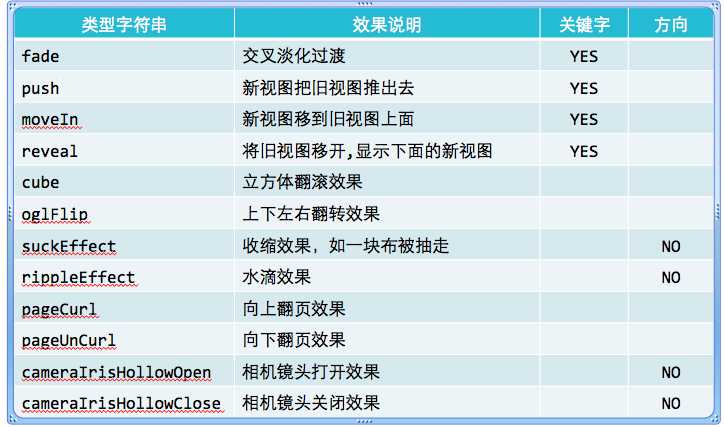
type : 动画过度类型
subtype : 动画过度方向
startProgress : 动画起点(在整体动画的百分比)
endProgress : 动画终点(在整体动画的百分比)
转场动画过度效果:

14)、使用UIView动画函数实现转场动画
+ (void) transitionWithView:(UIView *)view duration: (NSTimeInterval)duration options:(UIViewAnimationOptions)options animations:(void(^)(void))animations completion:(void(^)(BOOL finished))completion;
参数说明:
duration : 动画的持续时间
view : 需要进行转场动画的视图
options : 转场动画的类型
animations : 将改变视图属性的代码放在这个block中
completion : 动画结束后,会自动调用这个block
15)、CADisplayLink
CADisplayLink是一种以锁屏幕刷新频率触发的时钟机制,每秒钟执行大约60次左右;
CADisplayLink是一个计时器,可以使绘图代码与视图的刷新频率保持同步,而NSTimer无法确保计时器实际被触发的准确时间
使用方法:
定义CADisplayLink并制定触发调用方法
将显示链接添加到主运行循环队列
3、代码演示
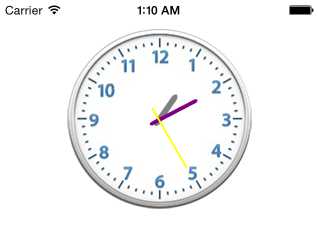
1)时钟器,和当前计算机时间同步,先看截图:

代码:
#import <UIKit/UIKit.h>

@interface ClockViewController : UIViewController

@end

  1 //  演示时钟器
  2
  3 #import "ClockViewController.h"
  4
  5 @interface ClockViewController ()
  6
  7 @property (nonatomic, retain) UIImageView *imgView; //时钟器
  8 @property (nonatomic, retain) CALayer *hourLayer; //时针
  9 @property (nonatomic, retain) CALayer *minuteLayer; //分针
 10 @property (nonatomic, retain) CALayer *secondLayer; //秒针
 11
 12 @end
 13
 14 @implementation ClockViewController
 15
 16 - (void)viewDidLoad {
 17     [super viewDidLoad];
 18     // Do any additional setup after loading the view.
 19     [self.view setBackgroundColor:[UIColor whiteColor]];
 20
 21     [self addImgAndLayer];  //添加子控件
 22     [self updateClockTime]; //更新时间
 23
 24     [NSTimer scheduledTimerWithTimeInterval:1.0 target:self selector:@selector(updateClockTime) userInfo:nil repeats:YES]; //每隔一秒重复运行
 25 }
 26
 27 //添加UIImageView和时分秒针
 28 - (void)addImgAndLayer{
 29     //1、添加UIImageView
 30     UIImage *img = [UIImage imageNamed:@"clock"];
 31     UIImageView *imgV = [[UIImageView alloc] initWithImage:img];
 32     [self.view addSubview:imgV];
 33     self.imgView = imgV;
 34     CGFloat width = imgV.frame.size.width;
 35     CGFloat height = imgV.frame.size.height;
 36     [self.imgView setFrame:CGRectMake((320 - width) * 0.5, 20, width, height)];
 37
 38     //2、添加时针
 39     CALayer *hourLa = [CALayer layer];
 40     hourLa.anchorPoint = CGPointMake(0.5, 0.8);
 41     hourLa.position = imgV.center;
 42     [hourLa setBounds:CGRectMake(0, 0, 6, height * 0.5 - 60)];
 43     hourLa.cornerRadius = 6;
 44     [hourLa setBackgroundColor:[UIColor grayColor].CGColor];
 45     [self.view.layer addSublayer:hourLa];
 46     self.hourLayer = hourLa;
 47
 48     //3、添加分针
 49     CALayer *minuteLa = [CALayer layer];
 50     minuteLa.anchorPoint = CGPointMake(0.5, 0.8);
 51     minuteLa.position = imgV.center;
 52     [minuteLa setBounds:CGRectMake(0, 0, 4, height * 0.5 - 45)];
 53     minuteLa.cornerRadius = 4;
 54     [minuteLa setBackgroundColor:[UIColor purpleColor].CGColor];
 55     [self.view.layer addSublayer:minuteLa];
 56     self.minuteLayer = minuteLa;
 57
 58     //4、添加秒针
 59     CALayer *secondLa = [CALayer layer];
 60     secondLa.anchorPoint = CGPointMake(0.5, 0.8);
 61     secondLa.position = imgV.center;
 62     [secondLa setBounds:CGRectMake(0, 0, 2, height * 0.5 - 30)];
 63     secondLa.cornerRadius = 2;
 64     [secondLa setBackgroundColor:[UIColor yellowColor].CGColor];
 65     [self.view.layer addSublayer:secondLa];
 66     self.secondLayer = secondLa;
 67
 68     //添加返回按钮
 69     UIButton *preBtn = [UIButton buttonWithType:UIButtonTypeCustom];
 70     [preBtn setTitle:@"返回" forState:UIControlStateNormal];
 71     [preBtn setFrame:CGRectMake(0, 400, 60, 20)];
 72     [preBtn setTitleColor:[UIColor purpleColor] forState:UIControlStateNormal];
 73     [preBtn addTarget:self action:@selector(prePage) forControlEvents:UIControlEventTouchUpInside];
 74     [self.view addSubview:preBtn];
 75 }
 76
 77 //改变时间
 78 - (void)updateClockTime{
 79     //1、获取日历控件
 80     NSCalendar *calendar = [NSCalendar currentCalendar];
 81     //2、获取时间组成部分(时分秒)
 82     NSDateComponents *dateCom = [calendar components:NSCalendarUnitHour | NSCalendarUnitMinute | NSCalendarUnitSecond fromDate:[NSDate date]];
 83
 84     //3、获取时分秒针旋转角度
 85     CGFloat angle = 2 * M_PI / 60.0;  //每个小格子所占的角度
 86     CGFloat secondAngle = dateCom.second * angle;  //秒针的位置
 87     CGFloat minuteAngle = (dateCom.minute + dateCom.second / 60.0) * angle;//分针的角度位置
 88     CGFloat hourAngle = (dateCom.hour % 12 ) * 2 * M_PI /12 + dateCom.minute * angle * 5 / 60; //时针的角度位置
 89     //NSLog(@"xiaoshi : %f, %d", hourAngle, dateCom.hour);
 90
 91     //4、从新旋转图层
 92     self.secondLayer.transform = CATransform3DMakeRotation(secondAngle, 0, 0, 1);
 93     self.minuteLayer.transform = CATransform3DMakeRotation(minuteAngle, 0, 0, 1);
 94     self.hourLayer.transform = CATransform3DMakeRotation(hourAngle, 0, 0, 1);
 95 }
 96
 97 //返回上一页
 98 - (void)prePage{
 99     [self dismissViewControllerAnimated:YES completion:nil];
100 }
101
102 - (void)didReceiveMemoryWarning {
103     [super didReceiveMemoryWarning];
104     // Dispose of any resources that can be recreated.
105 }
106
107 /*
108 #pragma mark - Navigation
109
110 // In a storyboard-based application, you will often want to do a little preparation before navigation
111 - (void)prepareForSegue:(UIStoryboardSegue *)segue sender:(id)sender {
112     // Get the new view controller using [segue destinationViewController].
113     // Pass the selected object to the new view controller.
114 }
115 */
116
117 @end
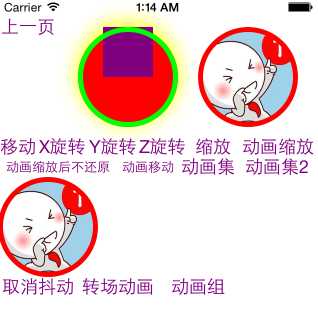
2) 、各种动画演示:

代码:
AnimationViewController.h文件
#import <UIKit/UIKit.h>

@interface AnimationViewController : UIViewController

@end
AnimationViewController.m文件

  1 //  图层动画
  2 //
  3
  4 #import "AnimationViewController.h"
  5
  6 @interface AnimationViewController ()
  7
  8 @property (nonatomic, retain) UIImageView *imgView;
  9 @property (nonatomic, retain) UIImageView *imgView2;
 10 @property (nonatomic, assign) NSInteger index;
 11
 12 @end
 13
 14 @implementation AnimationViewController
 15
 16 - (void)viewDidLoad {
 17     [super viewDidLoad];
 18     // Do any additional setup after loading the view.
 19     [self.view setBackgroundColor:[UIColor whiteColor]];
 20
 21     [self addPreBtn];   //增加返回按钮
 22     [self testLayer]; //图层
 23 }
 24
 25 - (void)testLayer{
 26     //1、增加UIView
 27     UIView *view = [[UIView alloc] initWithFrame:CGRectMake(80, 30, 100, 100)];
 28     [self.view addSubview:view];
 29     view.layer.backgroundColor = [UIColor redColor].CGColor;
 30     view.layer.cornerRadius = 50; //图层半径: 50刚好一个圆;小于50为一个圆角方形, 大于50为变型的图形
 31
 32     view.layer.borderWidth = 5;
 33     view.layer.borderColor = [UIColor greenColor].CGColor;
 34     //阴影
 35     view.layer.shadowColor = [UIColor yellowColor].CGColor;
 36     view.layer.shadowRadius = 10;
 37     view.layer.shadowOpacity = 1; //1表示阴影不透明;0表示透明,阴影看不见
 38
 39     //1.2增加子图层
 40     CALayer *subLayer = [[CALayer alloc] init];
 41     subLayer.position = CGPointMake(50, 50);
 42     subLayer.anchorPoint = CGPointMake(0.5, 1);
 43     subLayer.bounds = CGRectMake(0, 0, 50, 50);
 44     [subLayer setBackgroundColor:[UIColor purpleColor].CGColor];
 45     [view.layer addSublayer:subLayer];
 46
 47     //2、增加UIImageView
 48     UIImageView *imgView = [[UIImageView alloc] initWithFrame:CGRectMake(200, 30, 100, 100)];
 49     imgView.image = [UIImage imageNamed:@"first"];
 50     [self.view addSubview:imgView];
 51     imgView.layer.cornerRadius = 50; //等于50刚好裁剪一个圆;小雨50为圆角方形;大于50变形
 52     imgView.layer.masksToBounds = YES; //现实裁剪
 53     imgView.layer.borderWidth = 5;
 54     imgView.layer.borderColor = [UIColor redColor].CGColor;
 55     imgView.layer.shadowRadius = 5;
 56     self.imgView = imgView;
 57 //    imgView.layer.shadowColor = [UIColor redColor].CGColor;
 58 //    imgView.layer.shadowOpacity = 1;
 59
 60     //3、添加按钮测试形变
 61     UIButton *moveBtn = [UIButton buttonWithType:UIButtonTypeCustom];
 62     [moveBtn setTitleColor:[UIColor purpleColor] forState:UIControlStateNormal];
 63     [moveBtn setTitle:@"移动" forState:UIControlStateNormal];
 64     [moveBtn setFrame:CGRectMake(0, 140, 40, 20)];
 65     [moveBtn addTarget:self action:@selector(moveImgView:) forControlEvents:UIControlEventTouchUpInside];
 66     [self.view addSubview:moveBtn];
 67
 68     //4、添加X方向旋转按钮
 69     UIButton *rotationBtnX = [UIButton buttonWithType:UIButtonTypeCustom];
 70     [rotationBtnX setTitleColor:[UIColor purpleColor] forState:UIControlStateNormal];
 71     [rotationBtnX setTitle:@"X旋转" forState:UIControlStateNormal];
 72     [rotationBtnX setFrame:CGRectMake(40, 140, 50, 20)];
 73     [rotationBtnX addTarget:self action:@selector(rotationXImgView:) forControlEvents:UIControlEventTouchUpInside];
 74     [self.view addSubview:rotationBtnX];
 75
 76     //5、添加Y方向旋转按钮
 77     UIButton *rotationBtnY = [UIButton buttonWithType:UIButtonTypeCustom];
 78     [rotationBtnY setTitleColor:[UIColor purpleColor] forState:UIControlStateNormal];
 79     [rotationBtnY setTitle:@"Y旋转" forState:UIControlStateNormal];
 80     [rotationBtnY setFrame:CGRectMake(90, 140, 50, 20)];
 81     [rotationBtnY addTarget:self action:@selector(rotationYImgView:) forControlEvents:UIControlEventTouchUpInside];
 82     [self.view addSubview:rotationBtnY];
 83
 84     //6、添加Z方向旋转按钮
 85     UIButton *rotationBtnZ = [UIButton buttonWithType:UIButtonTypeCustom];
 86     [rotationBtnZ setTitleColor:[UIColor purpleColor] forState:UIControlStateNormal];
 87     [rotationBtnZ setTitle:@"Z旋转" forState:UIControlStateNormal];
 88     [rotationBtnZ setFrame:CGRectMake(140, 140, 50, 20)];
 89     [rotationBtnZ addTarget:self action:@selector(rotationZImgView:) forControlEvents:UIControlEventTouchUpInside];
 90     [self.view addSubview:rotationBtnZ];
 91
 92     //7、添加缩放按钮
 93     UIButton *scaleBtn = [UIButton buttonWithType:UIButtonTypeCustom];
 94     [scaleBtn setTitleColor:[UIColor purpleColor] forState:UIControlStateNormal];
 95     [scaleBtn setTitle:@"缩放" forState:UIControlStateNormal];
 96     [scaleBtn setFrame:CGRectMake(190, 140, 50, 20)];
 97     [scaleBtn addTarget:self action:@selector(scaleImgView:) forControlEvents:UIControlEventTouchUpInside];
 98     [self.view addSubview:scaleBtn];
 99
100     ///////// 动画演示 、、、、、、、、
101     //0、增加一个UIImageView
102     UIImageView *imgView2 = [[UIImageView alloc] initWithFrame:CGRectMake(0, 180, 100, 100)];
103     imgView2.image = [UIImage imageNamed:@"first"];
104     [self.view addSubview:imgView2];
105     imgView2.layer.cornerRadius = 50; //等于50刚好裁剪一个圆;小雨50为圆角方形;大于50变形
106     imgView2.layer.masksToBounds = YES; //现实裁剪
107     imgView2.layer.borderWidth = 5;
108     imgView2.layer.borderColor = [UIColor redColor].CGColor;
109     imgView2.layer.shadowRadius = 5;
110     imgView2.userInteractionEnabled = YES; //增加交互
111     self.imgView2 = imgView2;
112
113     //1、动画缩放默认还原
114     UIButton *scaleAniBtn = [UIButton buttonWithType:UIButtonTypeCustom];
115     [scaleAniBtn setTitle:@"动画缩放" forState:UIControlStateNormal];
116     [scaleAniBtn setFrame:CGRectMake(240, 140, 80, 20)];
117     [scaleAniBtn addTarget:self action:@selector(ainimationScale) forControlEvents:UIControlEventTouchUpInside];
118     [scaleAniBtn setTitleColor:[UIColor purpleColor] forState:UIControlStateNormal];
119     [self.view addSubview:scaleAniBtn];
120
121     //2、动画缩放后不还原
122     UIButton *scaleAniBtnNoRevert = [UIButton buttonWithType:UIButtonTypeCustom];
123     [scaleAniBtnNoRevert setTitle:@"动画缩放后不还原" forState:UIControlStateNormal];
124     [scaleAniBtnNoRevert setFrame:CGRectMake(0, 160, 120, 20)];
125     [scaleAniBtnNoRevert.titleLabel setFont:[UIFont systemFontOfSize:13]];
126     [scaleAniBtnNoRevert addTarget:self action:@selector(ainimationScaleNoRevert:) forControlEvents:UIControlEventTouchUpInside];
127     [scaleAniBtnNoRevert setTitleColor:[UIColor purpleColor] forState:UIControlStateNormal];
128     [self.view addSubview:scaleAniBtnNoRevert];
129
130     //3、增加动画移动
131     UIButton *moveAniBtn = [UIButton buttonWithType:UIButtonTypeCustom];
132     [moveAniBtn setTitle:@"动画移动" forState:UIControlStateNormal];
133     [moveAniBtn setFrame:CGRectMake(120, 160, 60, 20)];
134     [moveAniBtn.titleLabel setFont:[UIFont systemFontOfSize:13]];
135     [moveAniBtn addTarget:self action:@selector(animationMoveTransation:) forControlEvents:UIControlEventTouchUpInside];
136     [moveAniBtn setTitleColor:[UIColor purpleColor] forState:UIControlStateNormal];
137     [self.view addSubview:moveAniBtn];
138
139     //4、动画集合
140     UIButton *mulAniBtn = [UIButton buttonWithType:UIButtonTypeCustom];
141     [mulAniBtn setTitleColor:[UIColor purpleColor] forState:UIControlStateNormal];
142     [mulAniBtn setTitle:@"动画集" forState:UIControlStateNormal];
143     [mulAniBtn addTarget:self action:@selector(animationKeyframe) forControlEvents:UIControlEventTouchUpInside];
144     [mulAniBtn setFrame:CGRectMake(180, 160, 60, 20)];
145     [self.view addSubview:mulAniBtn];
146
147     //5、动画集合2 ,使用UIBearPath
148     UIButton *mulAniBtn2 = [UIButton buttonWithType:UIButtonTypeCustom];
149     [mulAniBtn2 setTitle:@"动画集2" forState:UIControlStateNormal];
150     [mulAniBtn2 setTitleColor:[UIColor purpleColor] forState:UIControlStateNormal];
151     [mulAniBtn2 addTarget:self action:@selector(animationKeyframe2) forControlEvents:UIControlEventTouchUpInside];
152     [mulAniBtn2 setFrame:CGRectMake(240, 160, 80, 20)];
153     [self.view addSubview:mulAniBtn2];
154
155     //6、长按抖动,动画集合3
156     UILongPressGestureRecognizer *gesture = [[UILongPressGestureRecognizer alloc] initWithTarget:self action:@selector(animationKeyframe3:)];
157     [self.imgView2 addGestureRecognizer:gesture]; //给imgView2增加长按手势
158     //7、第三行按钮: 取消抖动
159     UIButton *cancelDou = [UIButton buttonWithType:UIButtonTypeCustom];
160     [cancelDou setTitle:@"取消抖动" forState:UIControlStateNormal];
161     [cancelDou setTitleColor:[UIColor purpleColor] forState:UIControlStateNormal];
162     [cancelDou setFrame:CGRectMake(0, 280, 80, 20)];
163     [cancelDou addTarget:self action:@selector(removeAnimation) forControlEvents:UIControlEventTouchUpInside];
164     [self.view addSubview:cancelDou];
165
166     //8、转场动画
167     UIButton *trasitionBtn = [UIButton buttonWithType:UIButtonTypeCustom];
168     [trasitionBtn setTitle:@"转场动画" forState:UIControlStateNormal];
169     [trasitionBtn setTitleColor:[UIColor purpleColor] forState:UIControlStateNormal];
170     [trasitionBtn addTarget:self action:@selector(trasactionAnimation) forControlEvents:UIControlEventTouchUpInside];
171     [trasitionBtn setFrame:CGRectMake(80, 280, 80, 20)];
172     [self.view addSubview:trasitionBtn];
173
174     //9、动画组
175     UIButton *groupAniBtn = [UIButton buttonWithType:UIButtonTypeCustom];
176     [groupAniBtn setTitle:@"动画组" forState:UIControlStateNormal];
177     [groupAniBtn setTitleColor:[UIColor purpleColor] forState:UIControlStateNormal];
178     [groupAniBtn addTarget:self action:@selector(animationGroup) forControlEvents:UIControlEventTouchUpInside];
179     [groupAniBtn setFrame:CGRectMake(160, 280, 80, 20)];
180     [self.view addSubview:groupAniBtn];
181 }
182
183 //移动UIImageView
184 - (void)moveImgView:(UIButton *)sender{
185     [UIView animateWithDuration:1 animations:^{
186         if (sender.tag == 0){
187             self.imgView.layer.transform = CATransform3DMakeTranslation(-250, 400, 0);
188             sender.tag = 1;
189         }else{
190             sender.tag = 0;
191             self.imgView.layer.transform = CATransform3DTranslate(self.imgView.layer.transform, 250, -400, 0);
192         }
193     }];
194 }
195
196 //X旋转UIImageView
197 - (void)rotationXImgView:(UIButton *)sender{
198     [UIView animateWithDuration:1 animations:^{
199         self.imgView.layer.transform = CATransform3DRotate(self.imgView.layer.transform, M_PI, 1, 0, 0);
200     }];
201 }
202 //Y旋转UIImageView
203 - (void)rotationYImgView:(UIButton *)sender{
204     [UIView animateWithDuration:1.0 animations:^{
205          self.imgView.layer.transform = CATransform3DRotate(self.imgView.layer.transform, M_PI, 0, 1, 0);
206     }];
207 }
208 //Z旋转UIImageView
209 - (void)rotationZImgView:(UIButton *)sender{
210     [UIView animateWithDuration:1.0 animations:^{
211         self.imgView.layer.transform = CATransform3DRotate(self.imgView.layer.transform, M_PI, 0, 0, 1);
212     }];
213 }
214
215 //缩放
216 - (void)scaleImgView:(UIButton *)sender{
217     [UIView animateWithDuration:1 animations:^{
218         if (sender.tag == 0){
219             self.imgView2.layer.transform = CATransform3DMakeScale(0.5, 0.5, 0.0);
220             sender.tag = 1;
221         }else{
222             sender.tag = 0;
223             self.imgView2.layer.transform = CATransform3DMakeScale(1.0, 1.0, 0.0);
224         }
225     }];
226 }
227
228 //动画缩放
229 - (void)ainimationScale{
230     CABasicAnimation *basicAni = [CABasicAnimation animation];
231     basicAni.keyPath = @"transform.scale";
232     basicAni.toValue = @0.1;
233     basicAni.duration = 2;
234     [self.imgView2.layer addAnimation:basicAni forKey:nil];
235 }
236
237 //动画缩放不还原
238 - (void)ainimationScaleNoRevert:(UIButton *)sender{
239     CABasicAnimation *basicAni = [CABasicAnimation animation];
240     basicAni.keyPath = @"transform.scale";
241
242     if (sender.tag == 0){
243         basicAni.toValue = @1.5;
244         sender.tag = 1;
245     }else{
246         basicAni.toValue = @0.5;
247         sender.tag = 0;
248     }
249     basicAni.duration = 2;
250     //fillMode和removeOnCompletion两个属性都需要设置才能不还原
251     basicAni.fillMode = kCAFillModeForwards; //默认填充模式为一直向前
252     basicAni.removedOnCompletion = NO; //完成动画后不移除动画
253     [self.imgView2.layer addAnimation:basicAni forKey:nil];
254 }
255
256 //动画位置移动
257 - (void)animationMoveTransation:(UIButton *)sender{
258     CABasicAnimation *basicAni = [CABasicAnimation animation];
259     basicAni.keyPath = @"position";
260
261     if (sender.tag == 0){
262         basicAni.toValue = [NSValue valueWithCGPoint:CGPointMake(250, 450)];
263         sender.tag = 1;
264     }else{
265         basicAni.toValue = [NSValue valueWithCGPoint:CGPointMake(50, 230)];
266         sender.tag = 0;
267     }
268     basicAni.duration = 2;
269     //fillMode和removeOnCompletion两个属性都需要设置才能不还原
270     basicAni.fillMode = kCAFillModeForwards; //默认填充模式为一直向前
271     basicAni.removedOnCompletion = NO; //完成动画后不移除动画
272     [self.imgView2.layer addAnimation:basicAni forKey:nil];
273 }
274
275 //动画集合,测试CAKeyframeAnimation
276 - (void)animationKeyframe{
277     CAKeyframeAnimation *keyAni = [CAKeyframeAnimation animation];
278     NSValue *val1 = [NSValue valueWithCGPoint:CGPointMake(10, 10)];
279     NSValue *val2 = [NSValue valueWithCGPoint:CGPointMake(300, 10)];
280     NSValue *val3 = [NSValue valueWithCGPoint:CGPointMake(300, 400)];
281     NSValue *val4 = [NSValue valueWithCGPoint:CGPointMake(10, 400)];
282     keyAni.values = @[val1, val2, val3, val4];
283     keyAni.keyPath = @"position";
284     keyAni.duration = 2;
285     [self.imgView2.layer addAnimation:keyAni forKey:nil];
286 }
287 //测试UIBezierPath动画集合
288 - (void)animationKeyframe2{
289     CAKeyframeAnimation *keyAni = [CAKeyframeAnimation animation];
290     UIBezierPath *path = [UIBezierPath bezierPathWithOvalInRect:CGRectMake(50, 50, 220, 400)];
291     keyAni.path = path.CGPath;
292     keyAni.duration = 2;
293     keyAni.keyPath = @"position";
294     [self.imgView2.layer addAnimation:keyAni forKey:nil];
295 }
296 //动画集合3,长按抖动
297 - (void)animationKeyframe3: (UILongPressGestureRecognizer *)sender{
298     if (sender.state == UIGestureRecognizerStateBegan){
299         CAKeyframeAnimation *keyAni = [CAKeyframeAnimation animation];
300         keyAni.keyPath = @"transform.rotation";
301         keyAni.values = @[@(-M_PI_4 * 0.6), @(0), @(M_PI_4 * 0.6), @(0), @(-M_PI_4 * 0.6)];
302         keyAni.repeatCount = MAXFLOAT;
303         keyAni.duration = 0.2;
304         [self.imgView2.layer addAnimation:keyAni forKey:nil];
305     }
306 }
307
308 //取消抖动动画
309 - (void)removeAnimation{
310     [self.imgView2.layer removeAllAnimations];
311 }
312
313 //转场动画
314 - (void)trasactionAnimation{
315     _index++;
316     if (_index > 3){
317         _index = 0;
318     }
319
320     CATransition *tra = [CATransition animation];
321     tra.subtype = @"fromLeft";
322     tra.type = @"push"; //push推送(把前一个推走); moveIn移进去(慢慢覆盖前一个), fade:慢慢消失,默认;  reveal:离开
323     tra.duration = 0.5;
324     self.imgView2.image = [UIImage imageNamed:[NSString stringWithFormat:@"%i", _index]];
325
326     [self.imgView2.layer addAnimation:tra forKey:nil];
327 }
328
329 //动画组
330 - (void)animationGroup{
331     CABasicAnimation *rotation = [CABasicAnimation animation];
332     rotation.keyPath = @"transform.rotation";
333     rotation.toValue = @M_PI;//[NSValue valueWithCATransform3D:CATransform3DMakeRotation(M_PI, 1, 0, 0)];
334
335     CABasicAnimation *scale = [CABasicAnimation animation];
336     scale.keyPath = @"transform.scale";
337     scale.toValue = @3;//[NSValue valueWithCATransform3D:CATransform3DMakeScale(3, 3, 1)];
338
339     CABasicAnimation *position = [CABasicAnimation animation];
340     position.keyPath = @"position";
341     position.toValue = [NSValue valueWithCGPoint:CGPointMake(300, 450)];
342
343     CAAnimationGroup *group = [CAAnimationGroup animation];
344     group.animations = @[scale, position, rotation];
345     group.duration = 1;
346 //    group.removedOnCompletion = NO;
347 //    group.fillMode = kCAFillModeForwards;
348     [self.imgView2.layer addAnimation:group forKey:nil];
349 }
350
351 //增加上一页按钮
352 - (void)addPreBtn{
353     UIButton *preBtn = [[UIButton alloc] initWithFrame:CGRectMake(0, 20, 60, 20)];
354     [preBtn setTitle:@"上一页" forState:UIControlStateNormal];
355     [preBtn setTitleColor:[UIColor purpleColor] forState:UIControlStateNormal];
356     [preBtn addTarget:self action:@selector(previousPage) forControlEvents:UIControlEventTouchUpInside];
357     [self.view addSubview:preBtn];
358 }
359
360 //上一页
361 - (void)previousPage{
362     [self dismissViewControllerAnimated:YES completion:nil];
363 }
364
365 - (void)didReceiveMemoryWarning {
366     [super didReceiveMemoryWarning];
367     // Dispose of any resources that can be recreated.
368 }
369
370 /*
371 #pragma mark - Navigation
372
373 // In a storyboard-based application, you will often want to do a little preparation before navigation
374 - (void)prepareForSegue:(UIStoryboardSegue *)segue sender:(id)sender {
375     // Get the new view controller using [segue destinationViewController].
376     // Pass the selected object to the new view controller.
377 }
378 */
379
380 @end
标签:
原文地址:http://www.cnblogs.com/tandaxia/p/4722415.html